

Gua Bao – soft fluffy Bao buns stuffed with tender sticky pork belly.
I’m going to show you how to make it all at home, from scratch, in my easy-to-to-follow step-by-step recipe. After eating this you won’t be able to stop thinking about it until the next time you have it. It’s a vicious circle that I’m kinda happy about.

This is the kind of street food I crave – and just writing this post up now has made me throw out the idea of what we were going to have for dinner (which was steak fajitas btw) and replace them with this. I HAVE to eat them again.
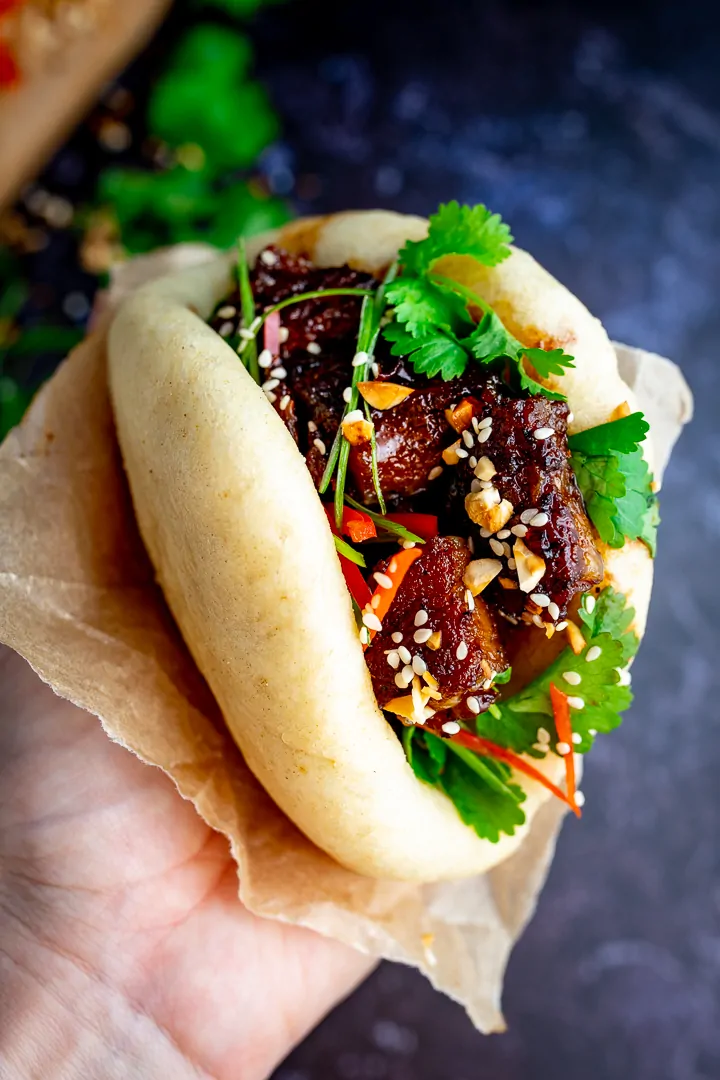
These are pretty large Bao buns (you can see in the pic below that they completely fill my hand), so one is probably enough for dinner. But we’re a little greedy, so I’ll be making extra, with some leftovers for lunch tomorrow.
I first made bao buns early last year for Neff. I have one of their steam ovens, which makes steaming these buns really easy. However, I’ve written (and tested) this recipe using my steam pan.(<– affiliate link). If you don’t have one, I thoroughly recommend getting yourself one. I use mine all the time for steaming veggies. They’re stack-able, so you’re saving hob space too – which is very useful when you’re making something with multiple dishes – like a good old roast beef dinner.
Let’s get back to the Gua Bao! You can check out the full recipe in the recipe card at the bottom of this post, but here’s the run-through with some pictures to help:
I start off making dough for the buns:
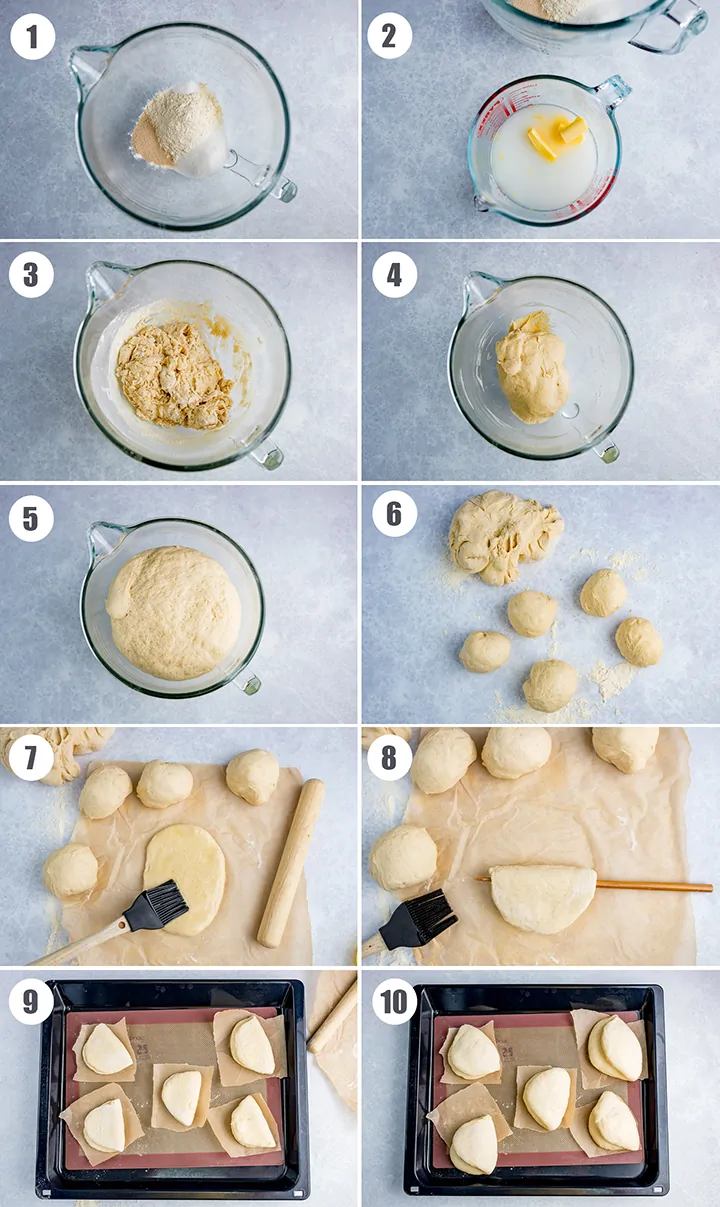
- Add flour, sugar, salt and yeast to a bowl and mix
- Add milk, warm water and butter to a jug and stir until the butter melts
- Stir the liquid into the the flour mixture
- Knead the dough for 10 minutes, then place in a bowl to rise
- Leave for 90 minutes or so until doubled in size
- Knead again and divide into 10 balls
- Roll out each ball into an oval and brush with oil
- Fold the dough over, using a chopstick in the middle to leave a little space in the fold
- Place on a baking tray to rise
- Leave for 60 minutes or so until puffed up
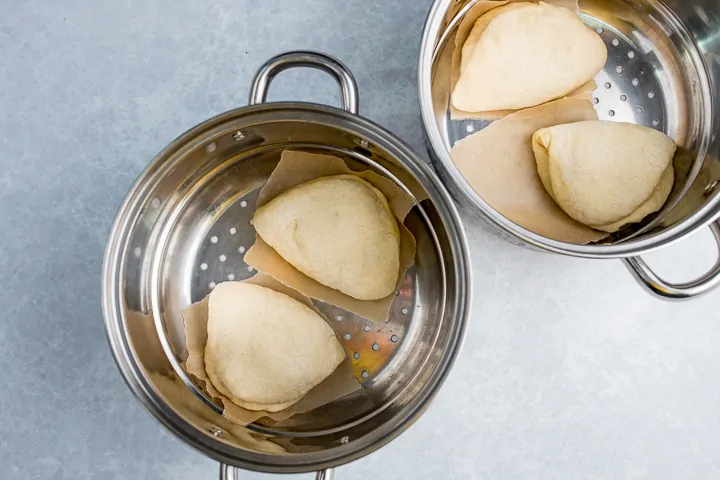
Then steam in a steam pan for 15 minutes:
I normally start slow cooking the pork when the buns are going through their first prove:
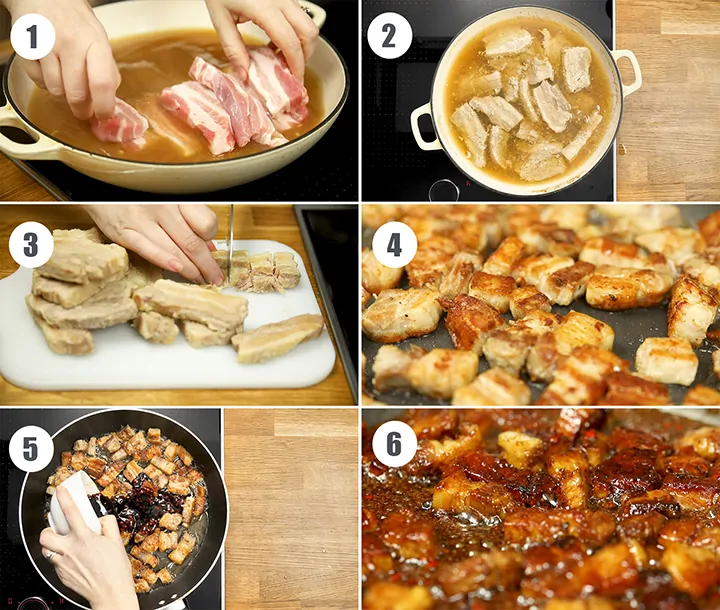
- Add pork belly slices to a pan with stock, ginger, garlic, rice wine and sugar
- Simmer for 2 hours until tender
- Drain and slice into small chunks
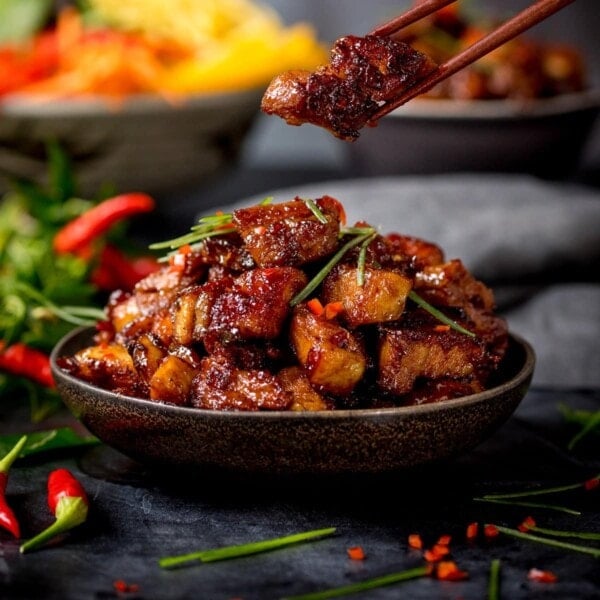
- At the same time as you’re steaming the bao buns, you can start frying the pork belly. Fry in a pan with a little oil and some salt and pepper until golden brown
- Add the glaze to the pan – which is a mixture of ginger, chilli, honey, brown sugar, soy sauce and lemon grass paste
- Bring to the boil and bubble until dark and sticky
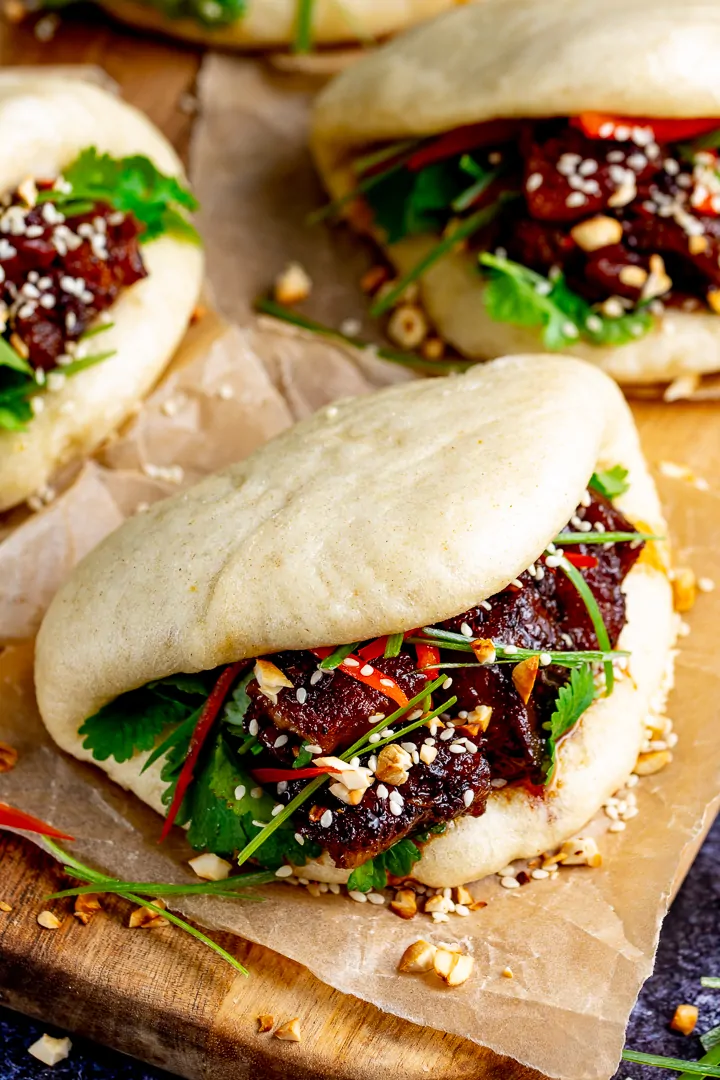
Then pile that sticky pork into the bao buns with lots of fresh coriander (cilantro), spring onions (scallions), strips of chilli, sesame seeds and chopped cashews:
You can also make mini versions of these buns – dividing the dough into 20 buns, or even 30 buns for bitesize ones. They’re great for a party food or as part of a buffet.
Other fillings for steamed bao buns:
- Chicken Satay Skewers with Spicy Peanut Sauce
- Thai Fish Cakes – with a drizzle of the chilli dipping sauce that comes with this recipe
- Katsu Pork with Katsu curry sauce
- Asian Chicken from my Asian chicken lettuce wraps
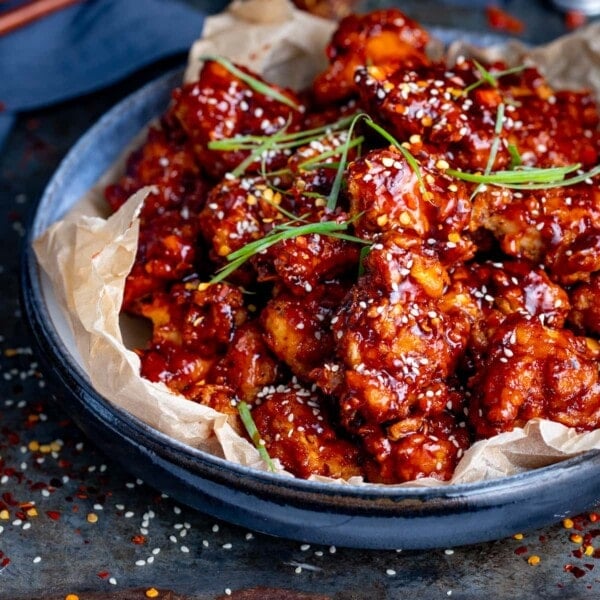
- Chinese Crispy Chicken with Honey Garlic Sauce
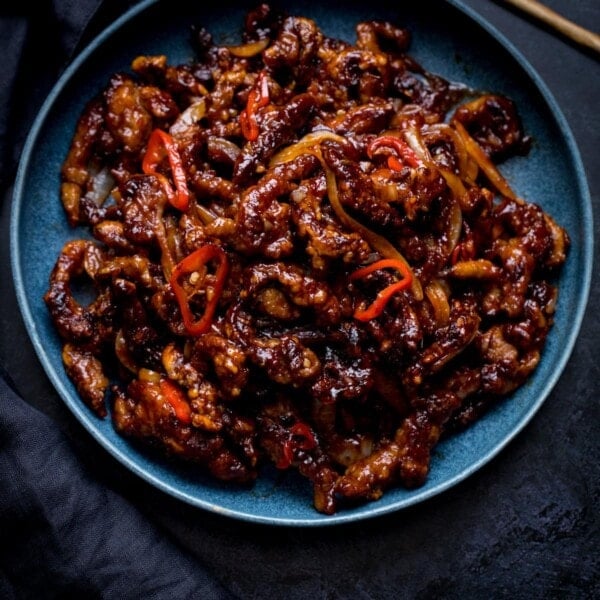
- Korean Beef Bulgogi from my bulgogi bowl
- Sesame Chicken – my favourite Asian chicken recipe
Other Asian Street Food Inspired Recipes:
- Pad Thai with king prawns
- Chicken Lo Mein – super easy to throw together
- Special Fried Rice – this is my masterclass post – taking you through it from start to finish – including how to boil the rice perfectly
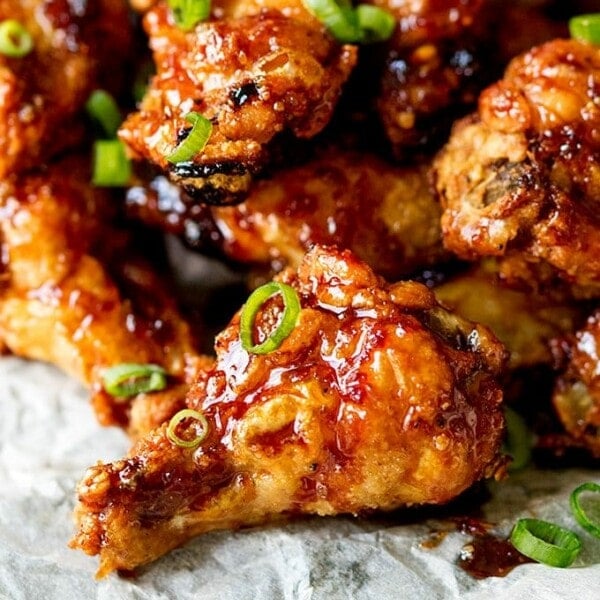
- Asian Sticky Chicken Wings – or cauliflower wings for a vegetarian version
- Kway Teow – another vegetarian option
- Malaysian Mee Siam – ready in 30 minutes!
The Gua Bao Recipe:

Gua Bao
Ingredients
Steamed buns:
- 450 g (3 3/4 cups) plain (all-purpose) flour
- 2 tbsp caster sugar
- ½ tsp salt
- 2 tsp (equivalent to one packet or 7g) instant dried yeast
- 3 tbsp whole milk
- 210 ml (3/4 cups + 2 tbsp) warm water
- 3 tbsp unsalted butter very soft
- 1 tbsp olive oil
Sticky Pork Belly:
Slow Cooked Pork Belly:
- 1 kg (2.2 lbs) rindless pork belly slices chopped in half (each piece being approx. the length of your index finger
- 1 litre (4 1/4 cups) hot chicken/veg stock
- 1 tbsp minced ginger
- 3 cloves garlic peeled and chopped in half
- 1 tbsp rice wine
- 1 tbsp caster sugar
Pork Belly Glaze:
- 2 tbsp vegetable oil
- pinch salt and pepper
- 1 tbsp minced ginger
- 1 red chilli finely chopped
- 2 tbsp honey
- 2 tbsp brown sugar
- 3 tbsp dark soy sauce
- 1 tsp lemon grass paste
Gua Bao Toppings:
- 1 small bunch coriander (cilantro) roughly torn
- 2 red chillies sliced into thin strips
- 4 spring onions (scallions) sliced into thin strips
- 1 tbsp sesame seeds
- 2 tbsp toasted cashew nuts chopped
Instructions
- Start by making the bao buns.
- Place the flour, sugar, salt, and yeast in a bowl and mix together.450 g (3 3/4 cups) plain (all-purpose) flour, 2 tbsp caster sugar, ½ tsp salt, 2 tsp (equivalent to one packet or 7g) instant dried yeast
- Add the milk, warm water and butter to a jug and stir together until the butter melts. Stir the liquid mixture into the flour mixture at first with a spoon, and then with your hands. Turn out onto a floured surface and knead for 10 minutes. Alternatively, you can do this in a mixer fitted with a dough hook.3 tbsp whole milk, 210 ml (3/4 cups + 2 tbsp) warm water, 3 tbsp unsalted butter
- Place the dough in an oiled bowl. Cover (with clingfilm or a damp tea towel and leave to prove until doubled in size - about 90 minutes - 2 hours).1 tbsp olive oil
- Meanwhile, start on the pork belly. Add all the slow-cooked pork belly ingredients to a pan (not the glaze ingredients use a cast iron casserole pan. Bring to the boil, then place a lid on, turn down the heat and simmer for 2 hours. Then turn off the heat and drain the pork. You can reserve the liquid if you like (Perfect for a Thai or Chinese noodle soup).1 kg (2.2 lbs) rindless pork belly slices chopped in half, 1 litre (4 1/4 cups) hot chicken/veg stock, 1 tbsp minced ginger, 3 cloves garlic, 1 tbsp rice wine, 1 tbsp caster sugar
- After the dough has proved, tip it out of the bowl onto a floured surface. Knead the dough again and split it into 10 balls. Place a piece of baking parchment on your work surface and roll each ball into an oval on top of the parchment, using a rolling pin – approx. 12cm x 8cm.
- Brush the ovals with the olive oil and fold each oval over, using a chopstick in the middle to fold over to leave a little space in the fold (so the oil is on the inside of the fold). Remove the chopstick.
- Prepare two oven trays by lining each with a piece of baking parchment. Place the buns on the trays - still on the baking parchment - as this will help you to move them later. Cover each tray with clingfilm or a carrier bag* (see note 1) and leave to prove for a further hour, until puffed up.
- Put a large steamer pan on to boil. Working in batches, place the buns in the steamer (you can keep them on the baking parchment and steam for 15 minutes. I use this pan - placing two buns in each layer.
- Whilst the bao buns are steaming, you can continue to cook the pork belly. Chop the pork into bite-sized chunks. Add 1 tbsp. of the oil to a frying pan, and then mix the remaining glaze ingredients in a small bowl.2 tbsp vegetable oil, 1 tbsp minced ginger, 1 red chilli, 2 tbsp honey, 2 tbsp brown sugar, 3 tbsp dark soy sauce, 1 tsp lemon grass paste
- Heat the oil and add in the pork, salt and pepper, frying on a high heat until the pork starts to turn golden. Now pour the glaze over the pork and continue to cook until the pork looks dark and sticky - about 6-7 minutes. Turn off the heat and transfer to a warm bowl until you're ready to assemble the gua bao.pinch salt and pepper
- Once the buns are cooked, open them up and stuff them with sticky pork belly, coriander (cilantro), slices of red chillies, and strips of spring onions. Sprinkle on sesame seeds and chopped cashews.1 small bunch coriander (cilantro), 2 red chillies, 4 spring onions (scallions), 1 tbsp sesame seeds, 2 tbsp toasted cashew nuts
Notes
Can I make the pork belly ahead?
Yes, you can make the pork belly up to the end of step 5 (where the pork is slow cooked and then drained). Then quickly cool, cover and refrigerate (for up to two days) or freeze. Defrost in the refrigerator overnight before slicing and frying the meat as per step 11. You can also mix the sauce ahead, then cover and refrigerate it up to a day ahead.Can I make the Bao buns ahead?
Yes, make the buns, then quickly cool, cover and refrigerate (for up to 2 days). Allow to come to room temperature before reheating. You can reheat (keep them covered) in the microwave for 20-30 seconds each bun. Or you can steam them for 5 minutes to reheat.Can I freeze the Bao Buns?
Yes, make the buns, then quickly cool, cover and freeze. Defrost overnight in the refrigerator and allow to come to room temperature before reheating. You can reheat (keep them covered) in the microwave for 20-30 seconds each bun. Or you can steam them for 5 minutes to reheat. You can also reheat the bao buns from frozen, by placing them in the steamer for 10 minutes, until hot throughout.Nutritional Information is approximate and is per filled large Gua Bao.
Nutrition
Nutrition information is automatically calculated, so should only be used as an approximation.
Some of the links in this post may be affiliate links – which means if you buy the product I get a small commission (at no extra cost to you). If you do buy, then thank you! That’s what helps us to keep Kitchen Sanctuary running. The nutritional information provided is approximate and can vary depending on several factors. For more information please see our Terms & Conditions.


So good! Thank you! I fry my pork belly in large strips, and next time I will make more of the glaze and will make the bao smaller.
Thank you so much for this recipe! I am throwing all others away, best bao, pork was delicious!!
Loved it!! This is a great recipe that delivers tender and flavoursome pork. The only part of it that I found “difficult” was frying the pork and it splattering everywhere but it wasn’t so much difficult as frustrating. And it was worth it!
I would probably double the glaze quantity next time. It’s so good! Thank you Kitchen Sanctuary. 😊
Perfect, I also once served it on rice and added crushed peanuts/jalapeños, bc I forgot to start the bao dough in time, and it’s great that way, too. The pork broth/ glaze is the best!
Have you tried to make these using gluten free flour?
You mention the the pork should be cut the length of your index finger, what about the width?