


Soft, flaky sea bass, drizzled in a sweet, spicy sauce and baked in the oven. Super quick and easy – ready in 12 minutes!
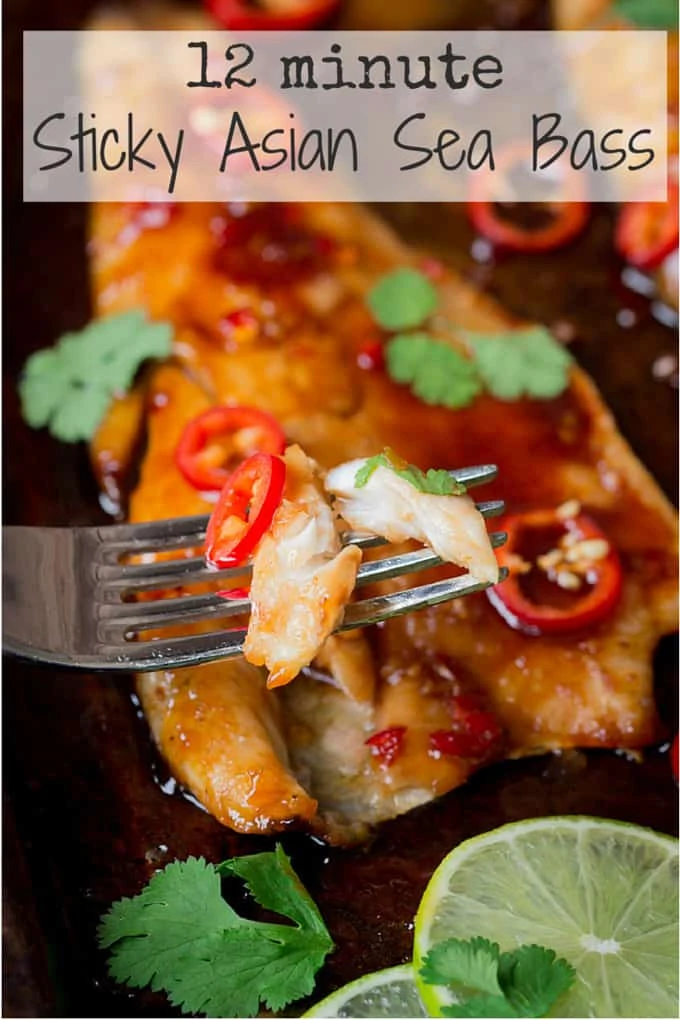
Just look at that soft and flaky fall-apart fish.
Who needs a plate? I could just eat this straight off the baking tray!!
Glazed with a salty, sticky chilli sauce it goes perfectly with some fluffy white rice or even some vegetable ribbons, like the ones I serve with my Thai fish cakes.
I’ve got a bit of a thing for sticky glazes lately. I swear that if I came back in another life as an insect, i’d be one of those annoying wasps that hangs around the sticky puddle of ice cream on the floor.
No idea where that came from. Sorry, the sugar must be going to my brain.
Now Sea Bass.
I love this stuff. Soft and delicate, yet totally versatile. It tastes amazing with a simple drizzle of browned butter, but it can also take slap-you-in-the-face flavours too.
I’d been cooking this pretty often since I went on my knife skills course at Leiths School of Food & Wine a few years back. We gutted and filleted one, then cooked it en-papillote with a mountain of chilli and coriander for lunch.
Oh man it was good. And it inspired me to come up with this simple dish!
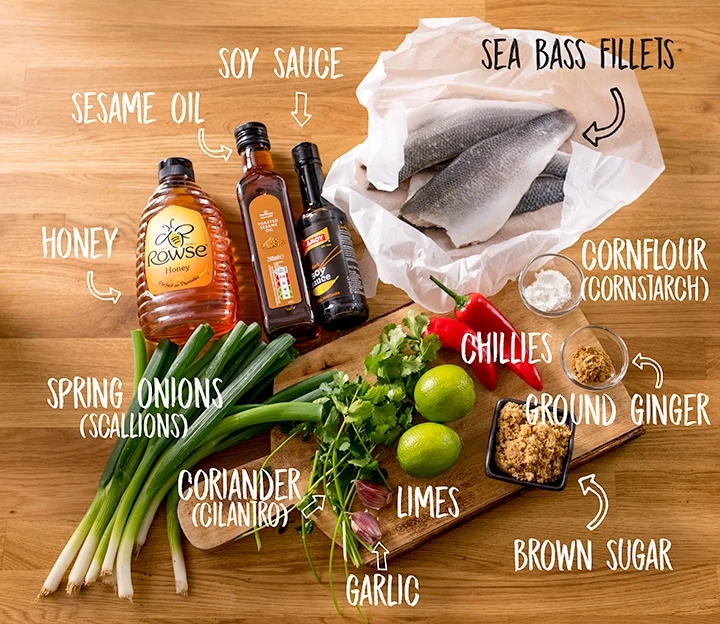
What do we need?
How do we make it?
- Mix sesame oil, chilli, honey, soy sauce, ginger, garlic and lime in a small bowl.
-
Place the sea bass fillets, skin-side down, on a baking tray. Sprinkle on a little cornflour (cornstarch if you’re in the US) and rub it into the fish gently.
-
Pour over the honey-soy sauce mixture and top with a sprinkle of brown sugar, then place in the oven to cook for 8 minutes, basting half-way through cooking.
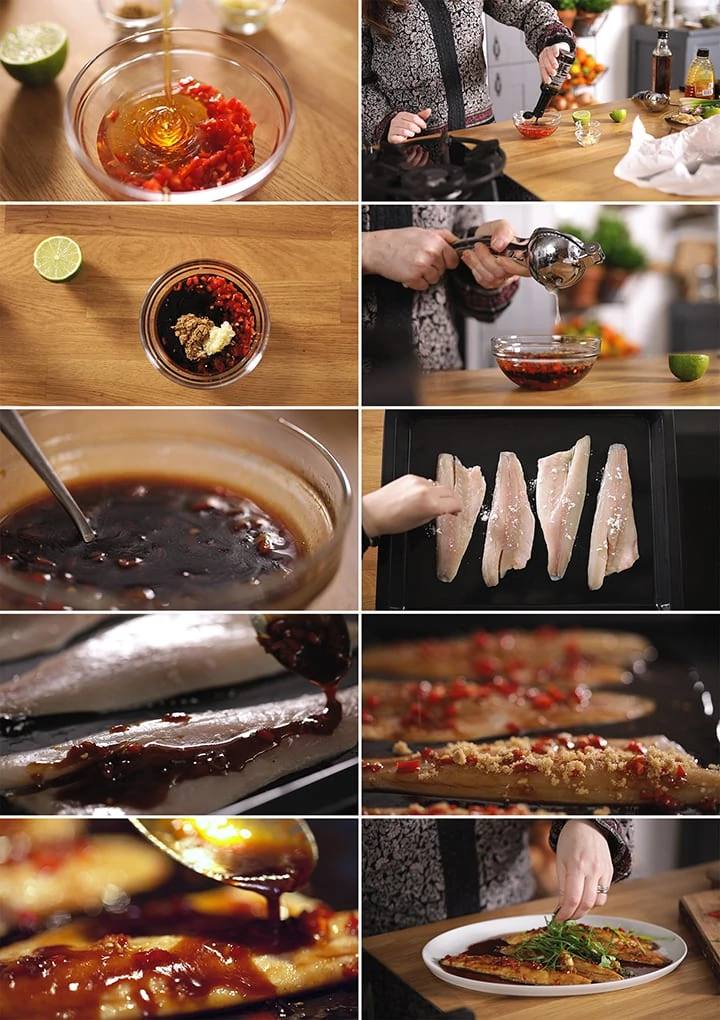
Once cooked, baste again then sprinkle coriander, spring onions (scallions) and slices of chilli and serve with lime slices and some boiled rice or salad.
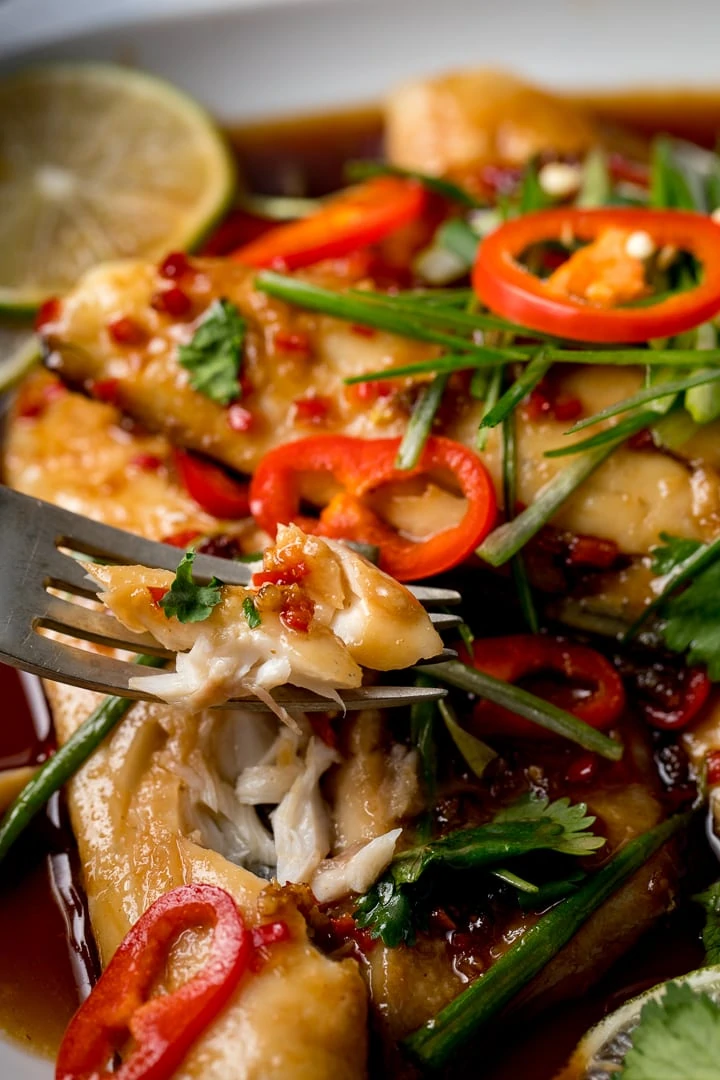
You’ll see that most of the sauce runs off and pools around the fish when it’s first poured on, but that’s ok. It’ll get thicker and stickier once it’s been in the oven and is starting to cool a little. Just pour that sauce from the tray back over the sea bass when you serve it up.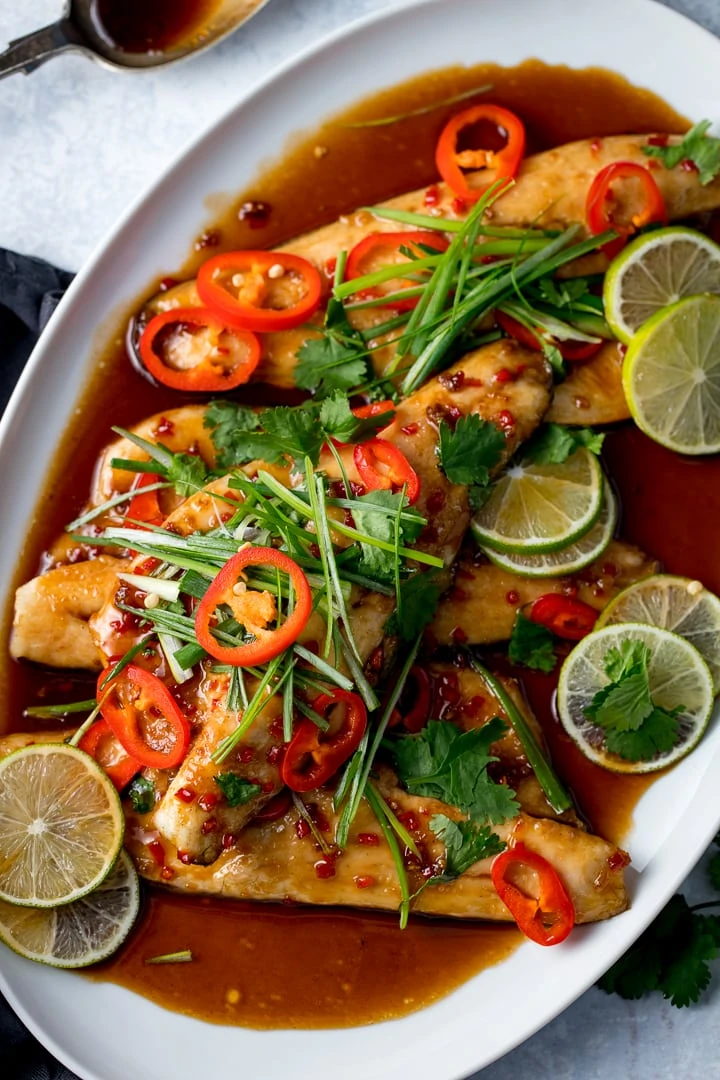
Other topping ideas:
Crispy fried strips of ginger, crispy fried onions (you can buy these ready made from larger stores), chilli flakes, sesame seeds or thinly sliced red onion would all make great alternatives or additional toppings.
Can I fry it instead?
Yes. Slash the skin of the sea bass two or three times, width-ways to help prevent the fish from curling when frying, then dust the fish with the cornflour (cornstarch).
Heat a little oil in a frying pan and fry the fish over a medium-high heat for 4-5 minutes, skin-side-down first, until the skin is crisp. Then turn over and cook for 1 minute.
Transfer to a warm plate. Add all of the sauce ingredients to the pan and bubble together for a couple of minutes. Then pour over the sea bass and top with the same toppings.
What to serve with Sticky Asian Sea Bass:
- Boiled Rice – check out my full post on how to boil rice (the method I ALWAYS use)
- Special Fried Rice – masterclass post on getting it perfect!
- Just leave the chicken out of my Lo Mein recipe for a lovely noodle side dish.
- This Winter Noodle Salad with miso dressing makes a great side dish
- Asian Mushrooms with Cashews and Veggies – baked in the oven too!
Got a craving for fish? How about these seafood recipes:
- Thai Fishcakes with Vegetable Ribbons
- Crispy Fish Tacos with Pico de Gallo
- Seafood Laksa in a spicy slurpy sauce
- Creamy Tuna Pasta Bake – a family favourite!
- Crispy Fish Burgers with Shoestring Fries
The Video:


12 minute Sticky Asian Sea Bass
Ingredients
- 2 tbsp sesame oil
- 1 red chilli finely chopped
- 4 tbsp honey
- 2 tbsp dark soy sauce replace with tamari for gluten-free
- ½ tsp ground ginger
- 2 cloves of garlic peeled and minced
- 1 tbsp fresh lime juice (the juice from half a small lime)
- 4 sea bass fillets skin on
- ½ tsp cornflour/cornstarch
- 2 tbsp light brown sugar
To Serve:
- 1 handful of fresh coriander (cilantro) torn
- 1 bunch of spring onions (scallions) sliced into thin strips
- 1 red chilli sliced thinly
- slices of lime
Instructions
- Preheat the oven to 200C/400F (fan).
- Mix the oil, chilli, honey, soy sauce, ginger, garlic and lime in a small bowl.2 tbsp sesame oil, 1 red chilli, 4 tbsp honey, 2 tbsp dark soy sauce, 1/2 tsp ground ginger, 2 cloves of garlic, 1 tbsp fresh lime juice
- Place the sea bass fillets, skin-side down, on a baking tray. Sprinkle on the cornflour and rub it into the fish gently.4 sea bass fillets, 1/2 tsp cornflour/cornstarch
- Spoon on the honey-soy sauce mix (it will pour off a little, but that's fine). Sprinkle on the sugar and place in the oven to cook for 8 minutes. Halfway through cooking, open the oven and baste the fish with the sauce in the tray (it will be stickier now it's been in the oven).2 tbsp light brown sugar
- Once the fish is cooked, take it out of the oven and baste again with sauce, then sprinkle the top with coriander (cilantro), spring onion (scallion) strips, and slices of chilli.1 handful of fresh coriander (cilantro), 1 bunch of spring onions (scallions), 1 red chilli
- Serve with lime slices and some boiled rice or salad.slices of lime
Video
Notes
Skin on or skinless fillets?
Go for skin on fillets (boneless). The skin will help the flesh of the fish hold together better, and will ensure the fish is more tender.Can I cook the sea bass in advance?
No, this really needs to be cooked right before serving, otherwise the fish will be chewy instead of tender and flakyYou can mix together the sauce ingredients beforehand (cover and leave at room temperature for up to a day) to speed things up even further when you make it.
Can I make it gluten free?
Yes, swap out the soy sauce for tamari and you're good to go. Nutritional information is per portion.Nutrition
Nutrition information is automatically calculated, so should only be used as an approximation.
This post was first published in March 2015. Updated in February 2020 with new photos, video and tips.
Some of the links in this post may be affiliate links – which means if you buy the product I get a small commission (at no extra cost to you). If you do buy, then thank you! That’s what helps us to keep Kitchen Sanctuary running. The nutritional information provided is approximate and can vary depending on several factors. For more information please see our Terms & Conditions.


Wow loved this recipe Nicky, went down very well with hubby & 2 adult sons! Followed recipe exactly only thing I did was sieved the sauce so that there was no red chilli in the sauce as thought it might be too spicy, hubby said sauce was perfect. Definitely will do this again
This is a keeper. I first used some chicken instead of fish that I had left over in the freezer and wanted to get rid of it before it went bad. Once used, I then cooked up the fish I had which was tilapia. I had this meal for a few nights in a row-made extra sauce and cut up more scallions , chilies and lime. I made a few changes by adding my low carb brown sugar into the honey soy sauce mix, rather than sprinkling it over the honey-soy sauce mix. I also used a honey substitute that had little to no sugar. I didn’t have any cornflour and besides both cornflour and cornstarch have carbs off the chart. Can’t use those ingredients when you’re pre-diabetic. So I alternated each night between using almond four, whey protein and baking powder. Next time I might not use any of them. The increment is so inconsequential, it doesn’t seem to need it. I didn’t use the coriander (cilantro) and I chopped the green onions rather than slicing them into strips. Next time I will cut the lime into quarters, easier to squeeze out the juice than lime slices. Thanks for sharing.
What’s the reason for sprinkling the sugar on after you’ve spooned on the honey-soy sauce mix? Why not just add the brown sugar along with the oil, chilli, honey, soy sauce, ginger, garlic and lime when you mix it all together in the small bowl to begin with. It seems like an unnecessary added step unless there’s some cooking chemistry going on that I’m not aware of.
Thanks
Absolutely love this recipe. I use this sauce for loads of different meats/fish too! Goes well with salmon with a similar technique. Thank you!
Hi!
I have just tried your recipe – lovely!!!!
Will be having that again 😊
Really tasty I used Walnut oil instead of sesame oil. So easy and family pleaser.
Absolutely delicious and so easy to prepare and cook. Will definitely make this again!
I have to say this was simply delicious. Made it absolutely as per instructions and put the sea bass on a bed of lentil noodles. So simple, so lovely, so do it
Useful Content. Thanks a lot for the info!
8 mins is not long enough to.cook the Cornelius. I gave it 10 and I could still taste it. Not nice
Cornelius should read corn flour