
This post may contain affiliate links. Please read our disclosure policy.
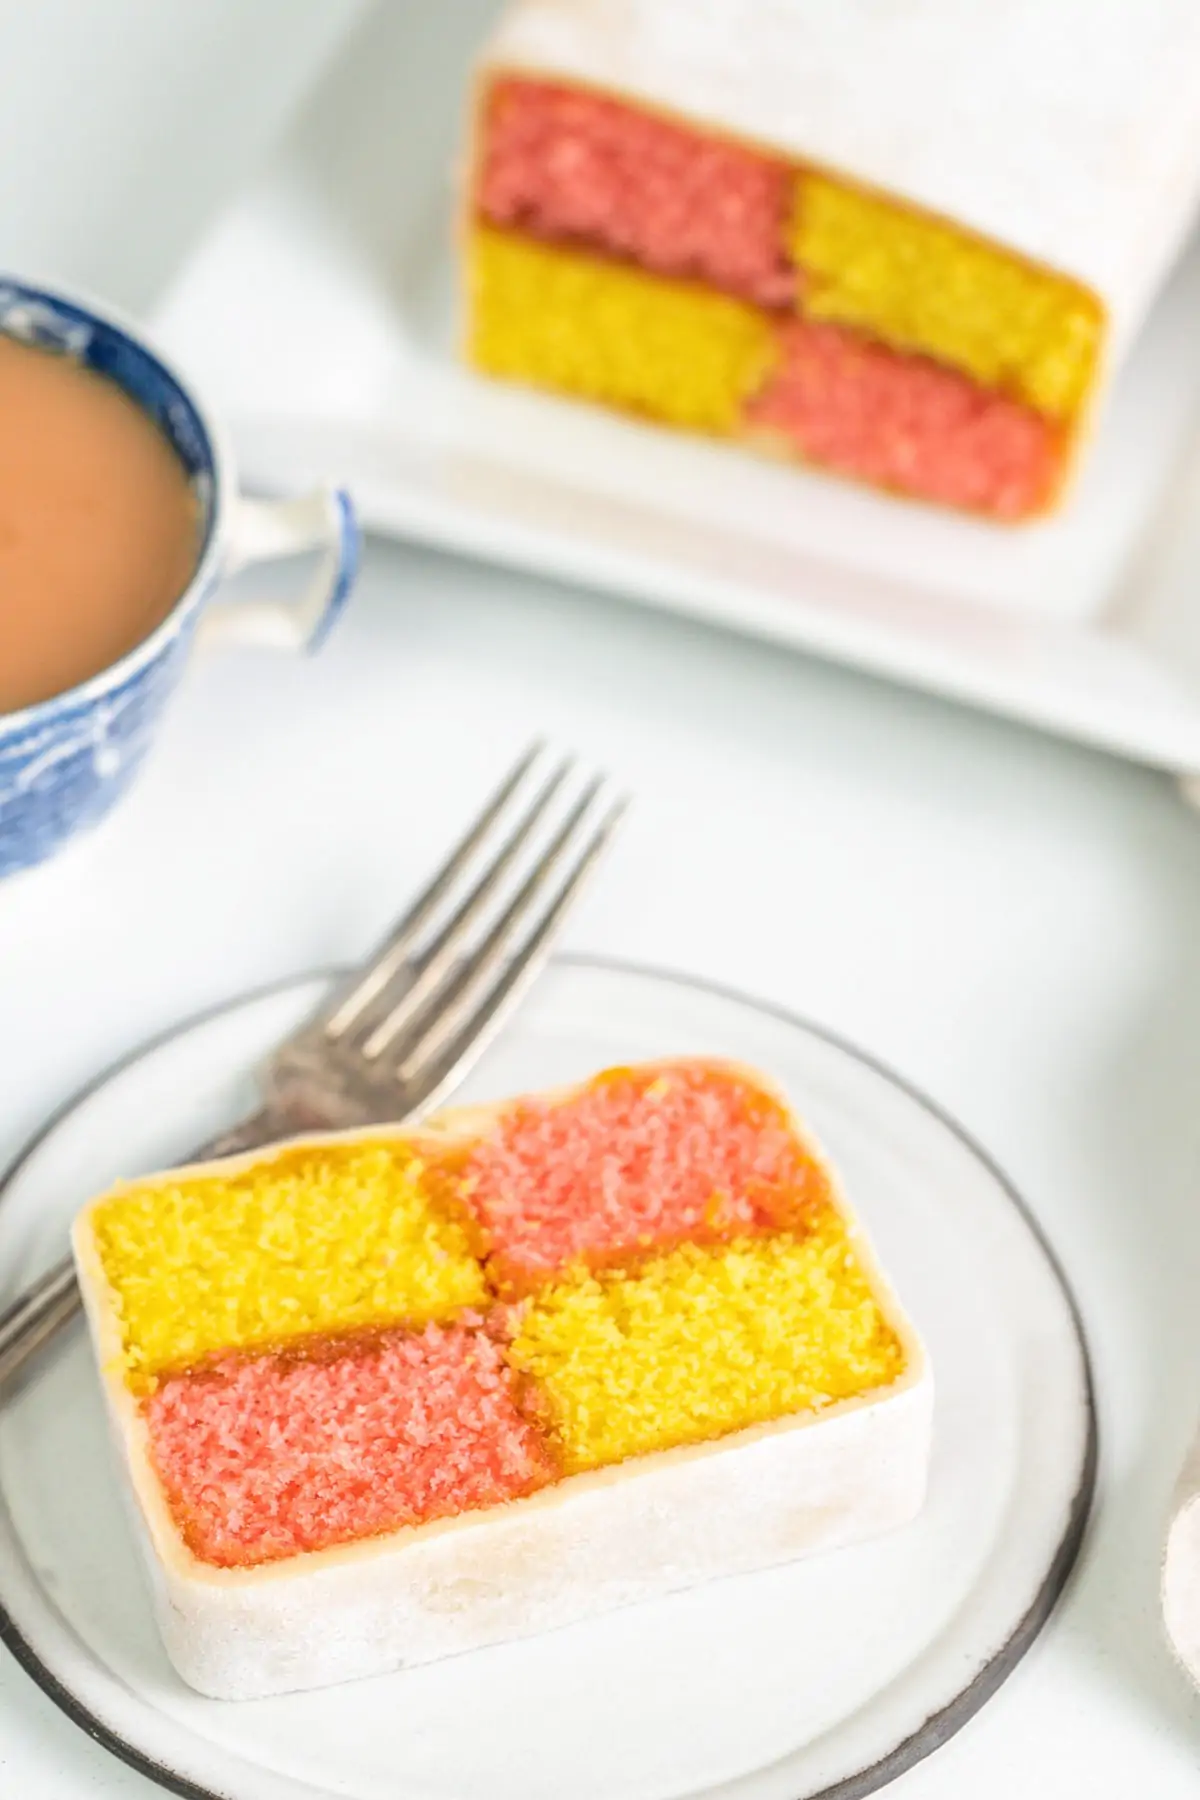
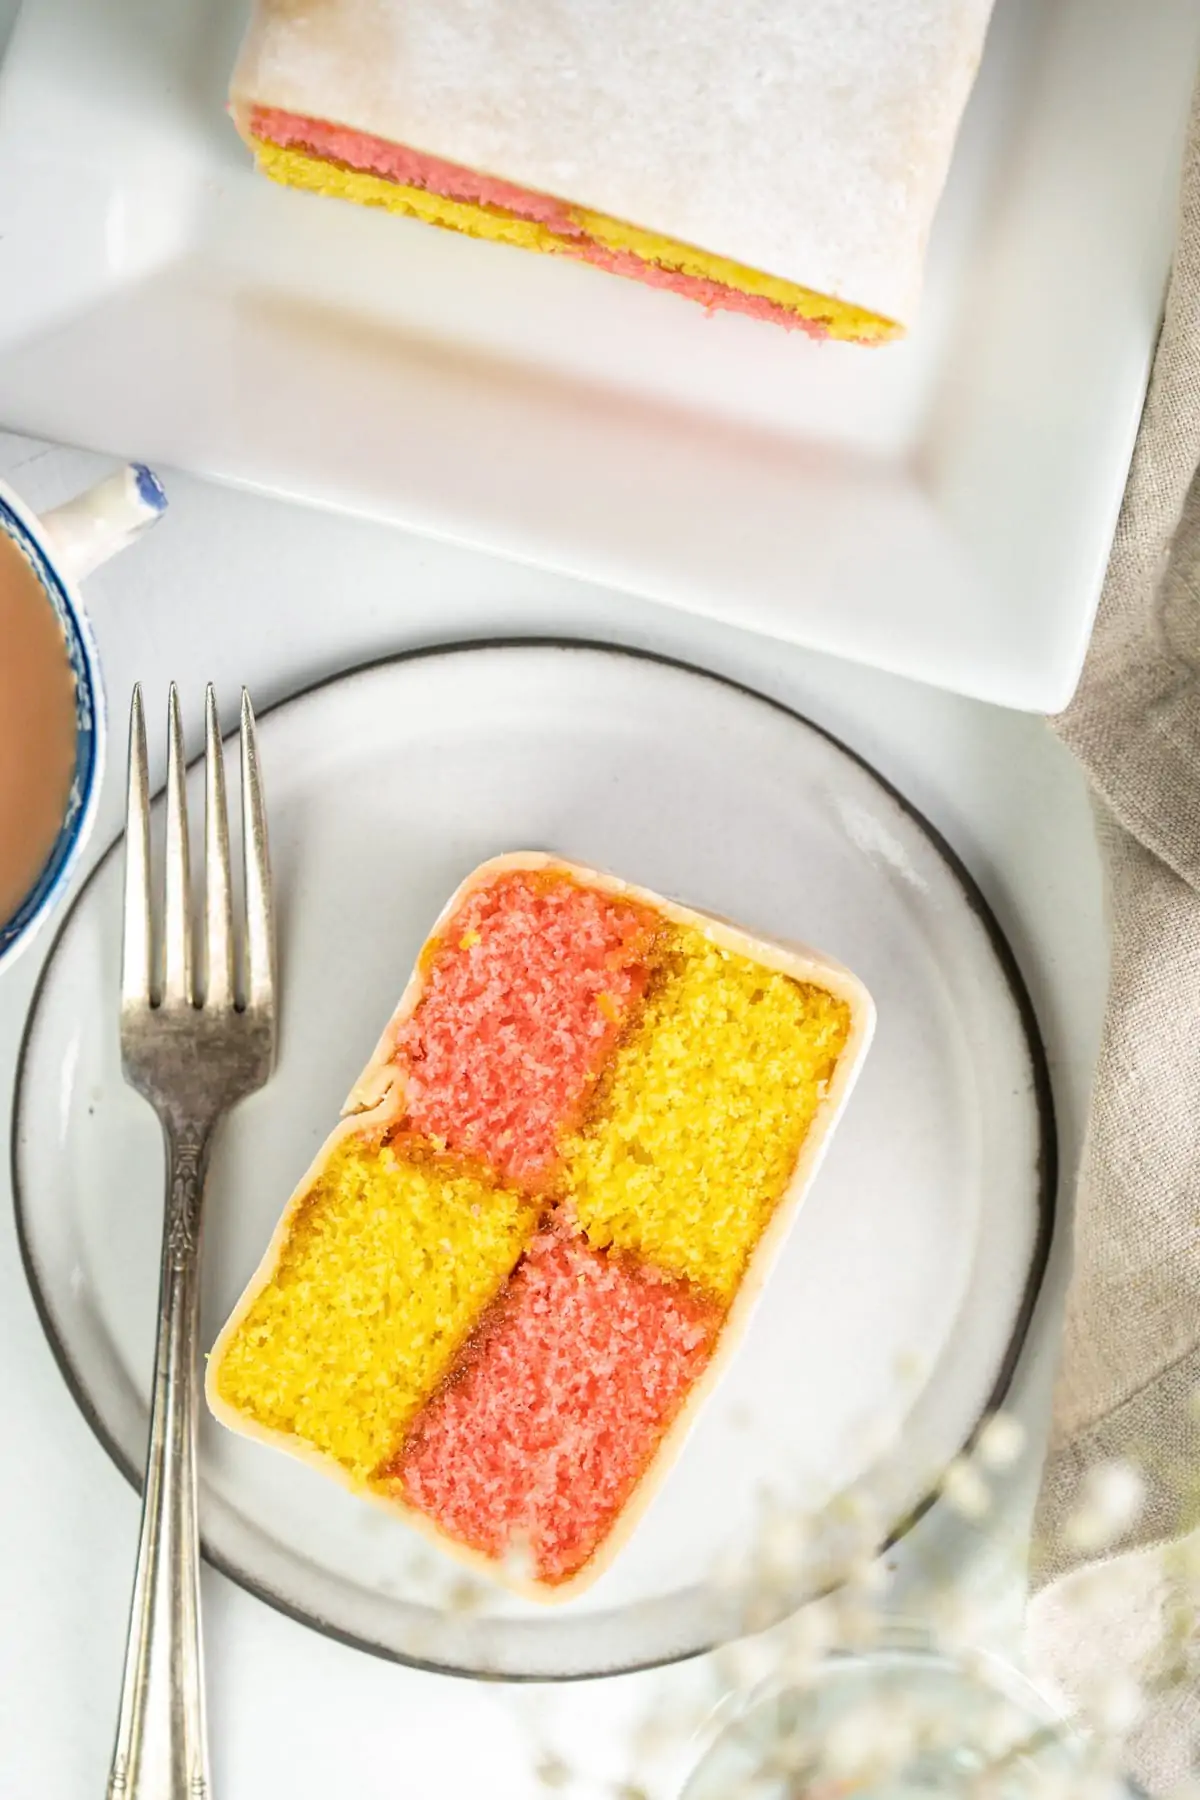
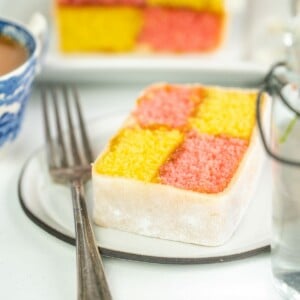
An English classic! This Battenberg cake consists of fluffy checked sponge all sandwiched together with jam and wrapped in thick almond marzipan.
I always get requests to make this for birthdays. A beautiful, flavourful cake that goes perfectly with a nice cup of tea.
This recipe actually makes two cakes. Sounds strange I know, but it’s easier to make two than it is to make one – I’ll explain more below.
Just give me all the marzipan!
I made this battenburg for Chris’s birthday recently since I know it’s one of his favourite cakes in the whole world, even more so than the Amaretti Cookies that he LOVES too!
Homemade battenberg is awesome, and this recipe makes TWO.
Sounds like overkill, but the first one will be gone before you’ve even finished your cup of tea, so it really is a good idea to make two.
It’s actually easier to make two.
Why?
Well we make a small square pink sponge and a small square yellow sponge for this cake. However, we only need half of the pink and half of the yellow sponge to make a single battenberg. So it makes sense to make two cakes.
I’ve tried splitting my little square cake tin in two using a foil divider in the middle, so I could have pink on one side and yellow on the other, but the cake batter seeps through the foil and makes a mess every time.
It really is easier to just go with two cakes.
If you really don’t think you can eat them both, then you could just freeze one. It freezes well, and makes a great treat a few weeks later when you forgot you made it!
📋 What do we need?
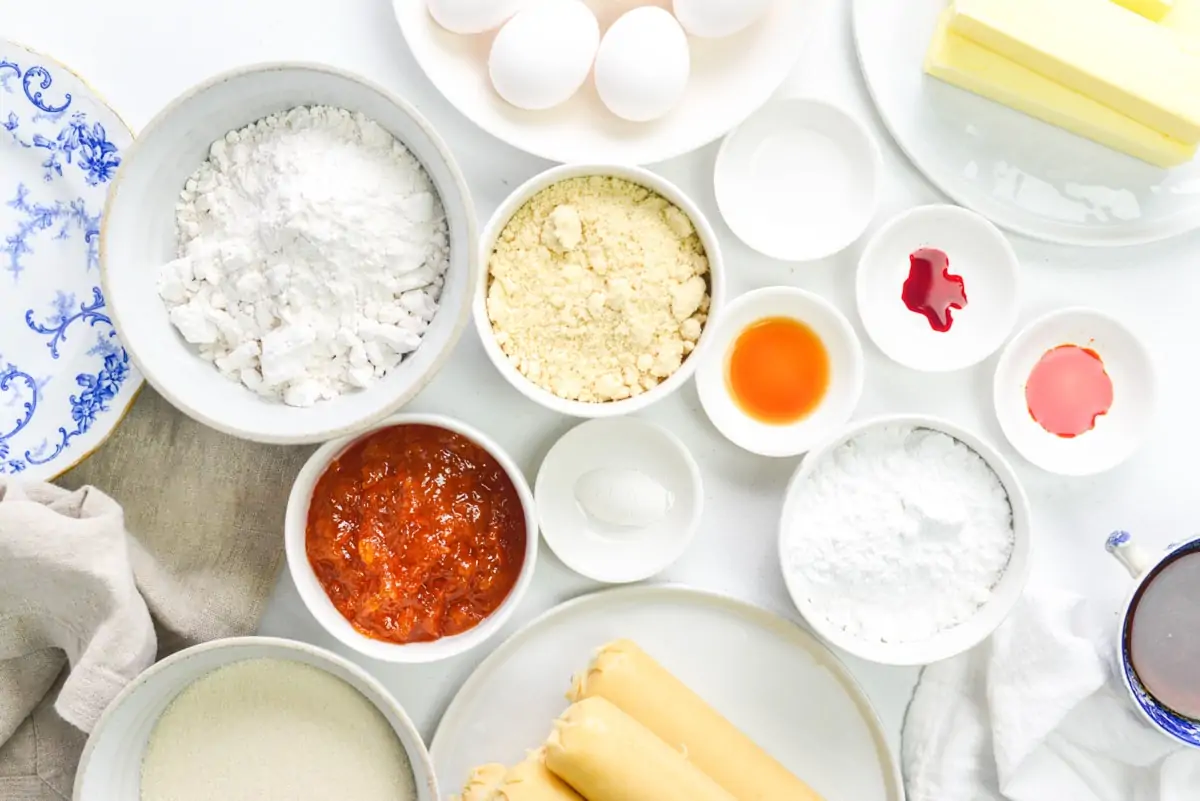
Make sure you’ve got plenty of confectioners’ sugar and apricot jam to hand and you’ll be fine.
🔪 How to make this Battenberg
Full recipe with detailed steps in the recipe card at the end of this post.
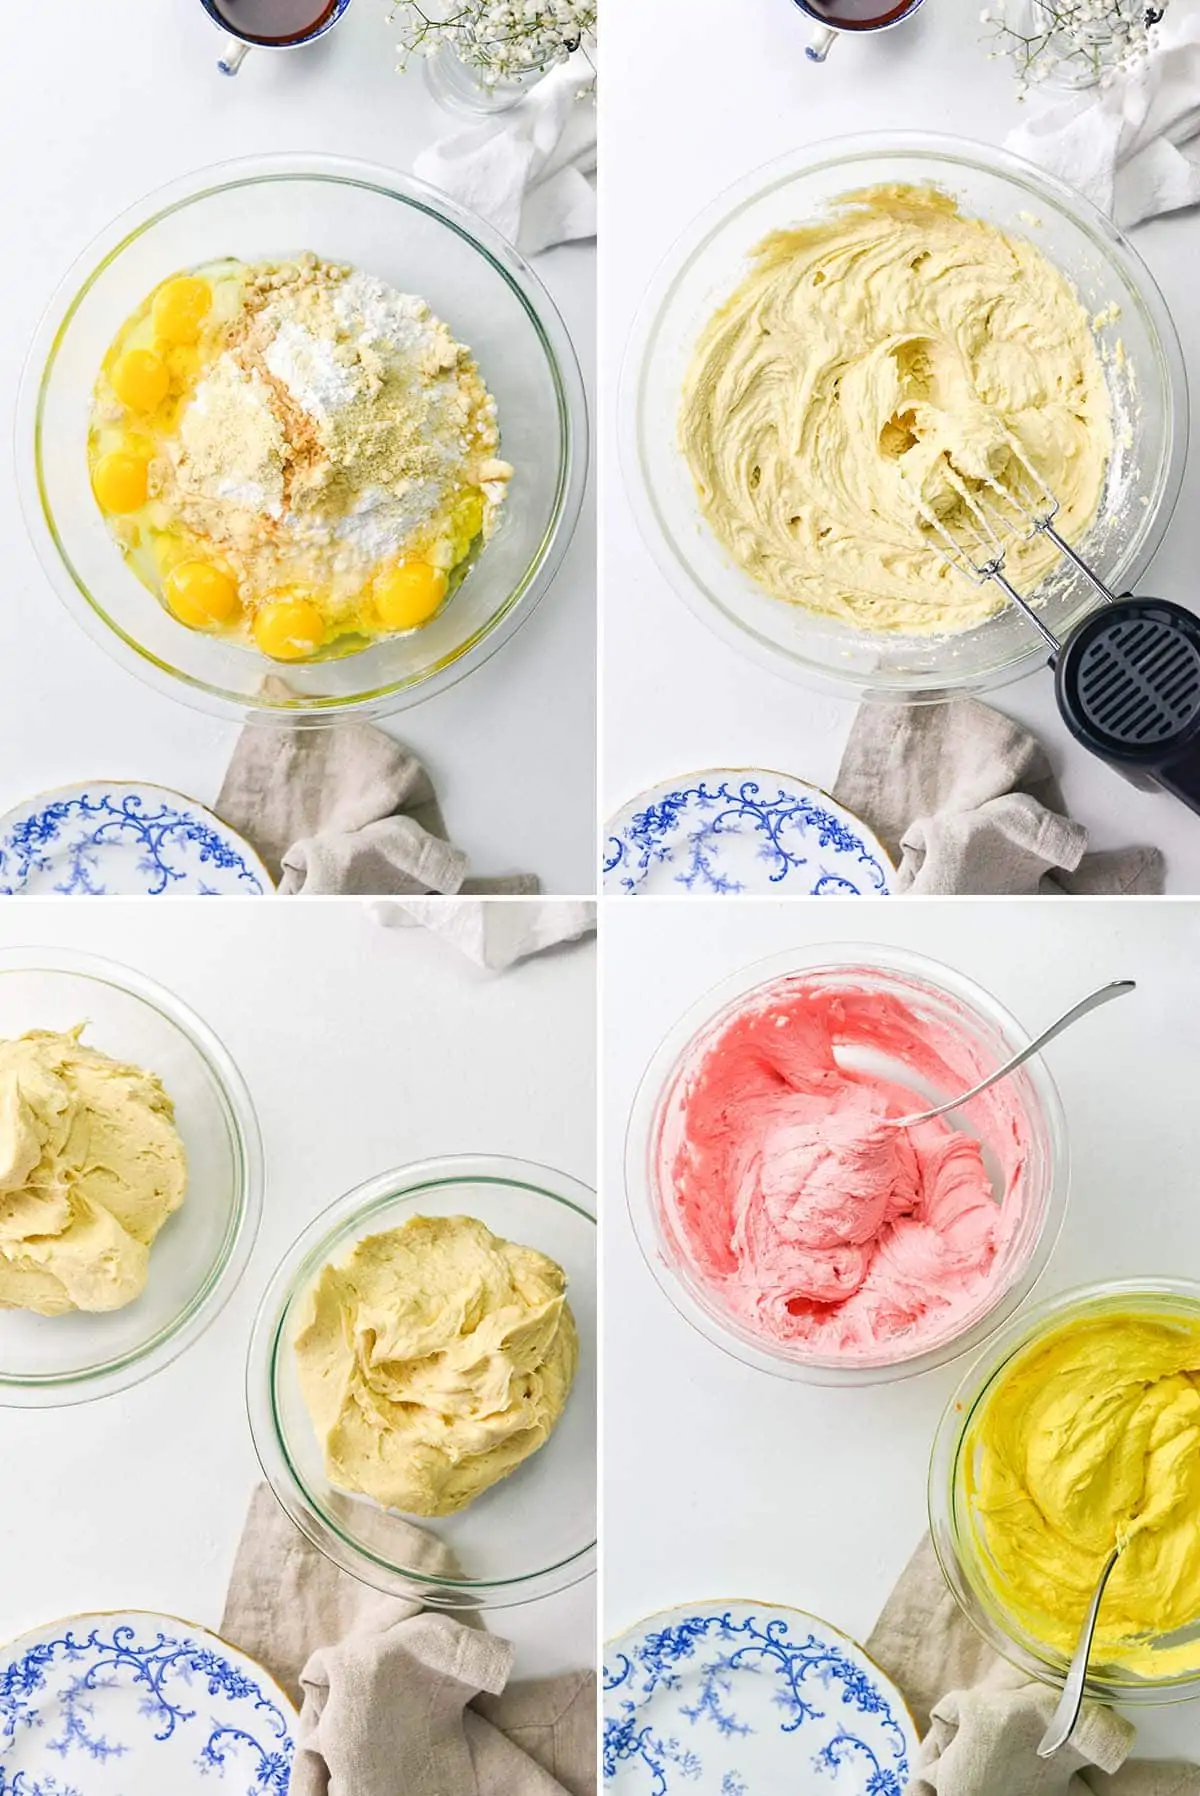
The cake mix is just a basic sponge of butter, sugar, flour, baking powder, ground almonds and eggs. I also like to add a little vanilla and almond extract in there too.
Once it’s all mixed together, we divide the mixture in two and colour one with yellow food colouring and the other with pink.
Then bake each mixture in a 20cmx20cm tin.
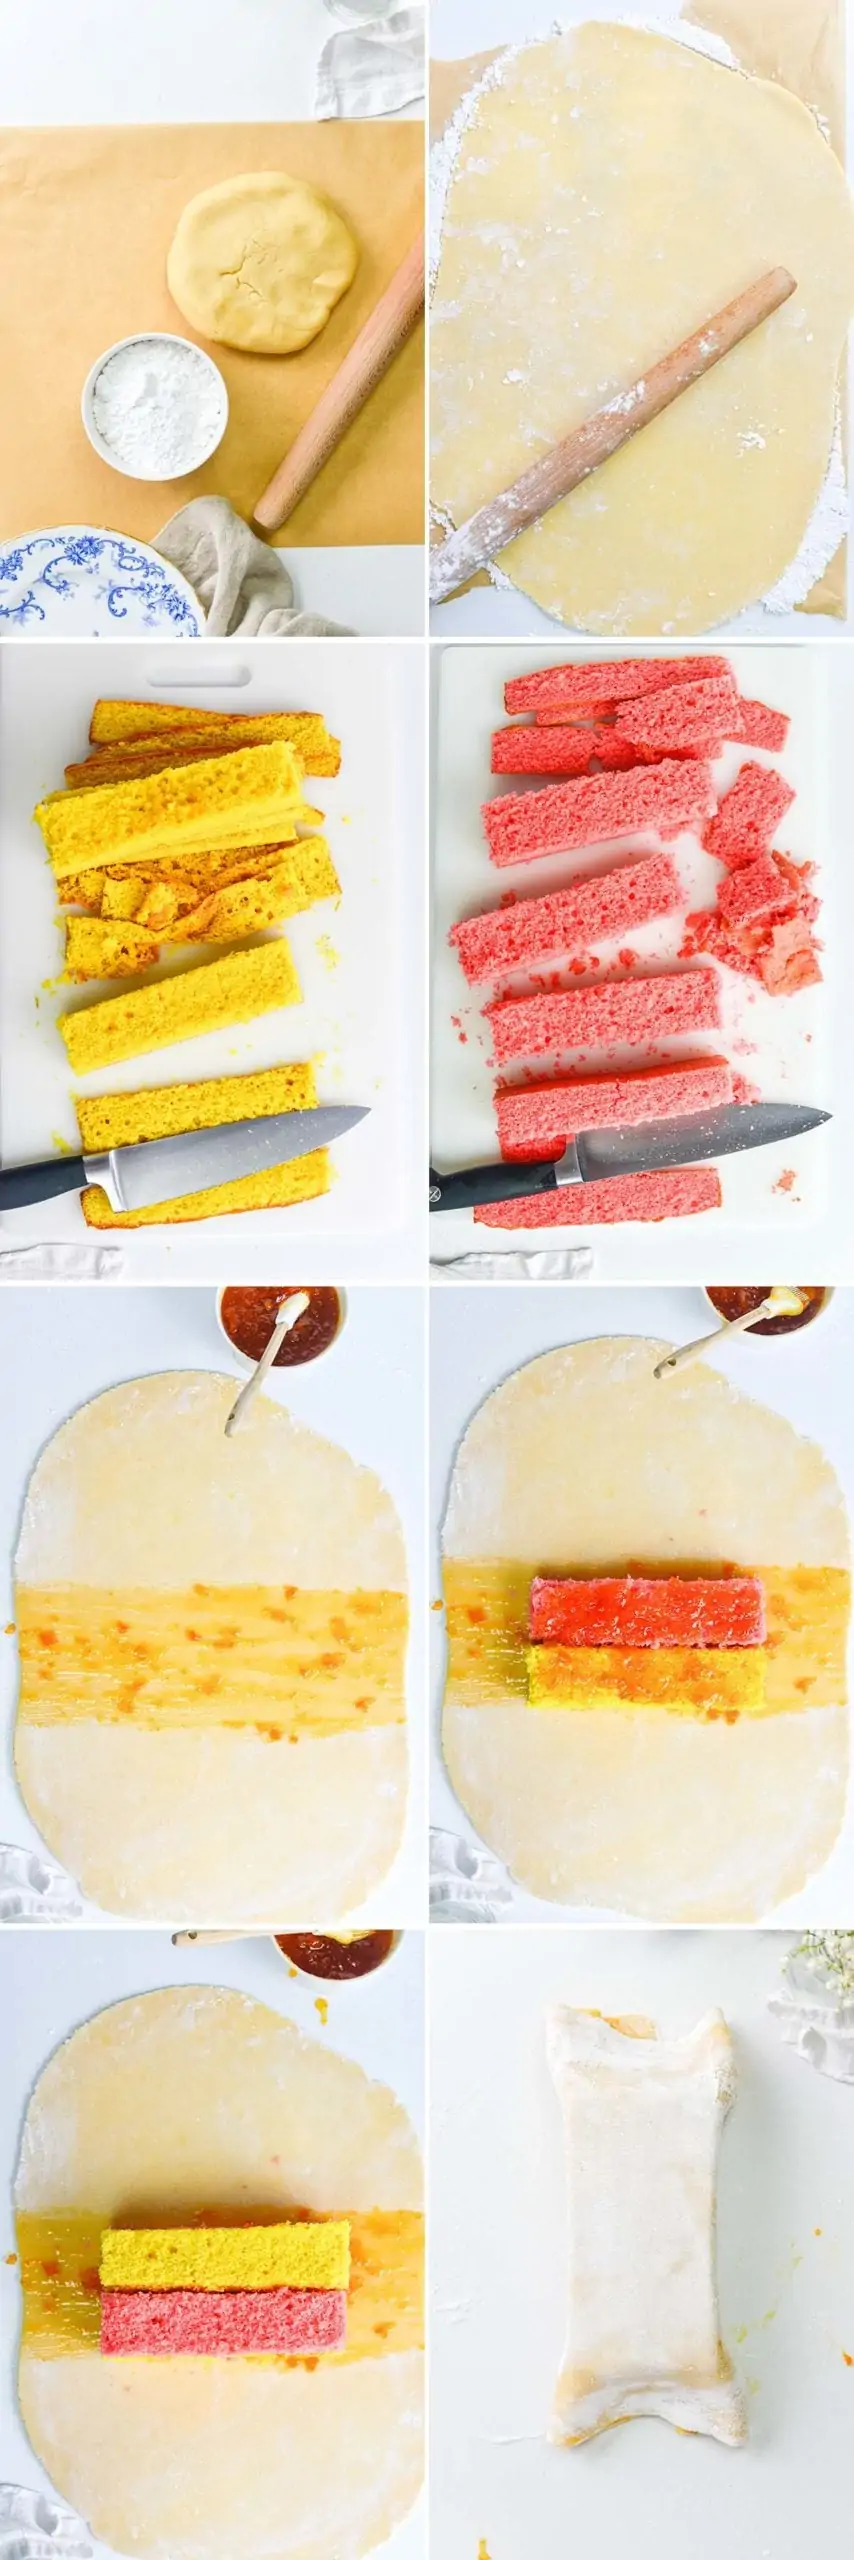
Once the cakes are cooked, trim the edges and slice each cake into four 20cm long fingers (5cm width).
- Next up we roll out one of the marzipan blocks on a surface that’s been dusted with LOTS of confectioners’ sugar. It needs to be a little more than 20cm wide and long enough to wrap around the cake (about 40cm).
- Brush centre of the rolled marzipan with apricot jam, then lay a yellow sponge finger on top. Brush the side of the yellow sponge.
- Stick a pink sponge finger to the yellow sponge. Brush the top of the two sponge fingers with jam and place the other two fingers on top (with jam in between those two fingers), so you have a checkerboard effect.
- Spread jam on the rest of the marzipan.
- Fold up the sides of the marzipan – making sure it’s quite tight, and well-adhered to the sponge. Fold the edges back on top of the cake and press them together – like you’re sealing a zip-lock bag. Trim the excess marzipan off the top of the cake.
- Check again that everything is well adhered, then slice off both ends of the cake – to give a neat finish.
- Repeat this process for the other cake.
- Turn the cakes over, so the seam is on the bottom, then sprinkle with a little confectioners’ sugar before serving.
👩🍳PRO TIP To get a lovely neat battenberg you’ll need to trim of the ends. Be sure to save them too – they’re the cooks treat!!
Serve with a nice cup of tea!
📺 Watch how to make it
🍲 More fantastic Cakes and Treats
Stay updated with new recipes!
Subscribe to the newsletter to hear when I post a new recipe. I’m also on YouTube (new videos every week) and Instagram (behind-the-scenes stories & beautiful food photos).
Battenberg Recipe
Ingredients
NOTE – this recipe makes two battenburg cakes!
- 360 g (1 1/2 cups) very soft unsalted butter
- 350 g (2 cups minus 4 tbsp) golden caster sugar (use superfine caster if you can't get golden)
- 280 g ( 2 cups + 2 tbsp) self-raising flour*
- 100 g (1 cup) ground almonds (almond flour in the USA)
- 1 tsp baking powder
- 6 medium eggs
- 1 tsp vanilla extract
- ½ tsp almond extract
- ⅛ tsp yellow food colouring gel I use Wilton concentrated gel**
- ⅛ tsp pink food colouring gel
Also:
- 2 x 500 g (2 x 17.5 oz) blocks yellow or white marzipan
- 300 g (3/4 cup) apricot jam
- 1 cup (1 cup) confectioners' sugar for rolling and dusting
Instructions
- Preheat the oven to 180C/350F (fan). Line the base and sides of two 20cmx20cm square baking tins with baking parchment.
- Place the butter, sugar, flour, ground almonds, baking powder, eggs, vanilla, and almond extract into the bowl of a stand mixer. Beat, using the whisk attachment, until smooth.360 g (1 1/2 cups) very soft unsalted butter, 350 g (2 cups minus 4 tbsp) golden caster sugar , 280 g ( 2 cups + 2 tbsp) self-raising flour*, 100 g (1 cup) ground almonds , 1 tsp baking powder, 6 medium eggs, 1 tsp vanilla extract, 1/2 tsp almond extract
- Divide the mixture into two (weigh it out to ensure it's even). Add the almond extract and the yellow food colouring to one bowl and mix together.1/8 tsp yellow food colouring gel
- Add the pink food colouring to the other bowl and mix. You want a vibrant yellow and pink colour, so add a little more colouring if required.1/8 tsp pink food colouring gel
- Spoon one of the mixtures into one tin, and the other into the other tin. Smooth the top and ensure the cake batter is spread into the corners. Place in the oven and bake for 25-30 mins until an inserted skewer comes out clean.
- Allow to cool for 10 minutes in the tin, then transfer to a wire rack to cool completely.
- Time to assemble. Roll out one of the marzipan blocks on a surface that's been dusted with LOTS of confectioners' sugar. It needs to be a little more than 20cm wide, and long enough to wrap around the cake (about 40cm).2 x 500 g (2 x 17.5 oz) blocks yellow or white marzipan
- Heat the apricot jam in a small pan (or microwave for a few seconds) until runny.300 g (3/4 cup) apricot jam
- Take one of the cakes and trim the sides and top so that the cooked edges are cut off (you can leave the bottom). Cut the sponge into four long fingers – ensuring the height and width of each finger are equal.
- Repeat with the other sponge.
- Brush the centre of the rolled marzipan with apricot jam (see picture), then lay a yellow sponge finger on top.
- Brush the side of the yellow sponge, and stick a pink sponge finger to it. Brush the top of the two sponge fingers with jam and place the other two fingers on top (with jam in between those two fingers), so you have a checkerboard effect.
- Spread jam on the rest of the marzipan then fold up the sides – making sure it's quite tight and well adhered to the sponge.
- Fold the edges back on top of the cake and press them together – like you're sealing a zip-lock bag. Trim the excess marzipan off the top of the cake.
- Check again that everything is well adhered, then slice off both ends of the cake – to give a neat finish.
- Repeat this process for the other cake.
- Turn the cakes over, so the seam is on the bottom, then sprinkle with a little confectioners' sugar and serve.1 cup (1 cup) confectioners' sugar
Video
Notes
If you can’t get self-raising flour, replace with a mixture of 2 cups all-purpose mixed with 3 tsp baking powder (see more info here) and also add the other 1 tsp baking powder further down the ingredients list. ** Food colouring
Food colouring gel/pastes are better than food colouring liquid, as they have a more intense colour that won’t fade during baking. Storage:
Any leftover cake should be wrapped in baking parchment and stored in an airtight box at room temperature. It should keep for 2-3 days.
Alternatively, you can seal in an airtight container and freeze for up to a month. Source:
I based this recipe on the one from the BBC Good Food website – just a few changes here and there to simplify and shorten the process. Nutritional Information is per slice.
Nutrition
Nutrition information is automatically calculated, so should only be used as an approximation.
This post was first published in August 2016. Update August 2021 with new photos, video, tips, and a bit of housekeeping.
Some of the links in this post may be affiliate links – which means if you buy the product I get a small commission (at no extra cost to you). If you do buy, then thank you! That’s what helps us to keep Kitchen Sanctuary running. The nutritional information provided is approximate and can vary depending on several factors. For more information please see our Terms & Conditions.


I need to make 12x8in battenberg for a boys birthday 12in long and 8ins wide to make a mini golf course can I used the recipe of the two cakes you do but in a 12×8 in traybake will I have to adjust the ingredients could you please let me know thank you
Wow! I can’t believe you made this yummy cake from scratch. I am definitely pinning this one!
I love the recipes so good and I can’t stop eating them. 🙂
Fantastic!! Tastes better than shop bought. Definitely worth the time and effort. I will be making this again and again 👍🏼
Had to bake this for my son, it’s one of his favourites. Guess what I’m he best mum in the world.