

My ultimate guide to making soft and fluffy Brioche Burger Buns that don’t fall apart with that juicy burger.
They take a little bit of patience, but they’re so worth it for the ultimate burger!
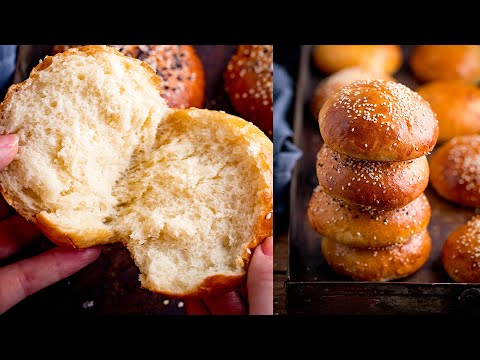
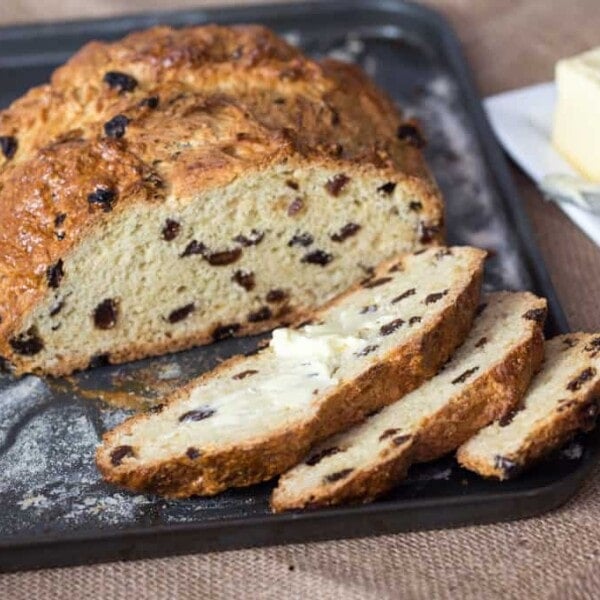
Oh how I love these Soft and Light Brioche Burger Buns! With a good burger!
More and more often fashionable burger restaurants in the UK are taking the lead from the US and using brioche rolls to serve their burgers on. I’ve seen it in Byron burger (the classic Byron burger is delicious), Gourmet burger (I could eat a million of their skinny fries with garlic mayo) and Five Guys (hooray! so glad they’ve finally branched out to the UK).
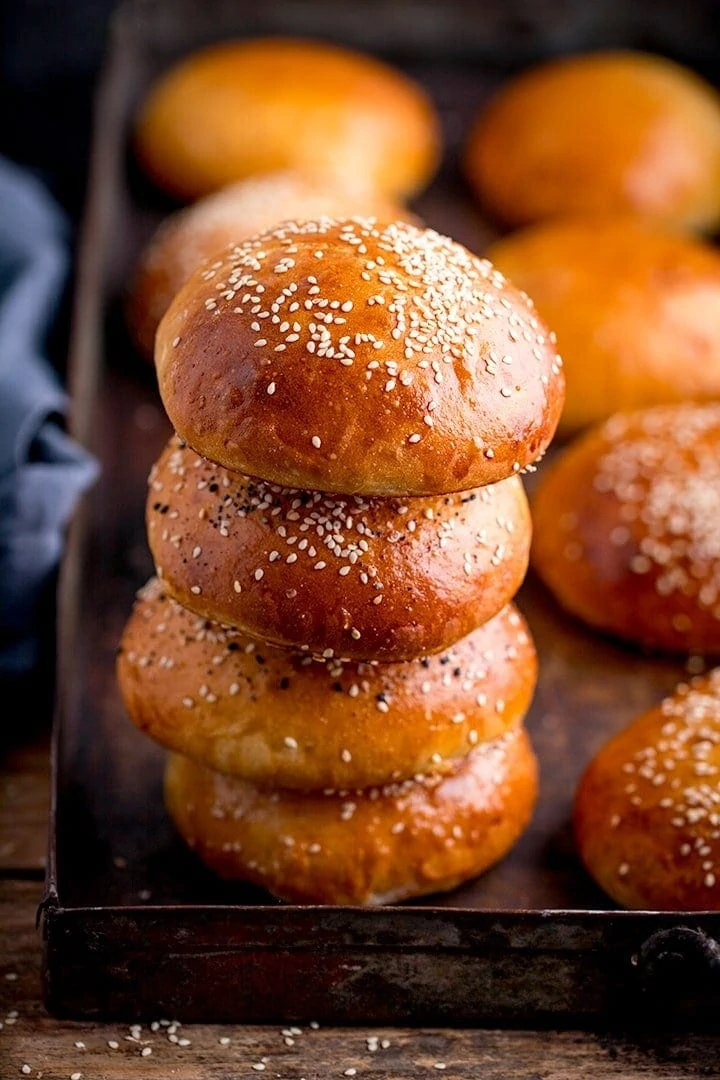
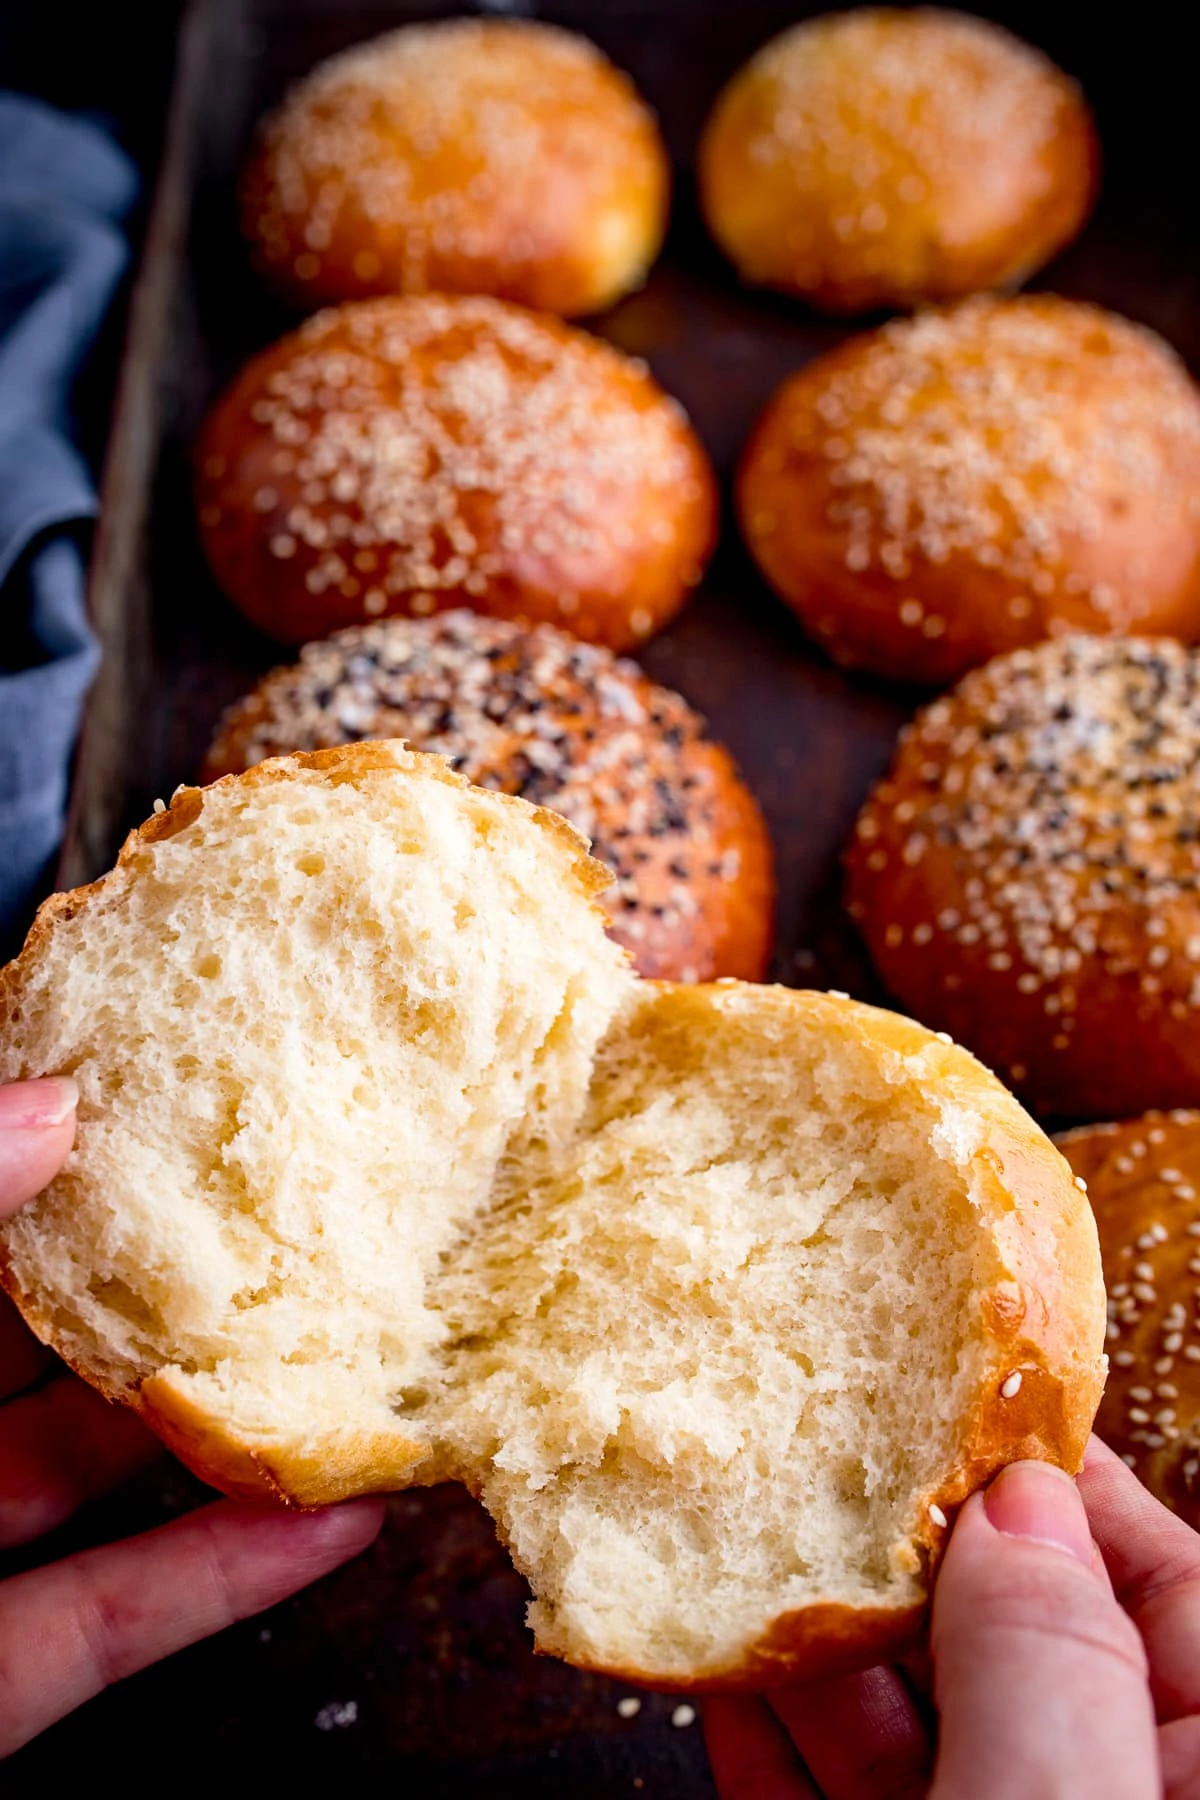
I love the subtle sweetness of a good brioche. It’s got to be shiny, dark golden and soft enough on the outside to wrinkle when you bite into it. The inside has of course got to be soft, light and fluffy, but gently toasted to ensure that all of that lovely sauce and cheese doesn’t completely sink in.
The only problem with brioche, is that they can be so rich and soft, that they start to fall apart halfway through eating that juicy burger. Disaster!
So I’ve been working on a brioche recipe that’s a little less rich (fewer eggs and less sugar) than regular brioche, still lovely and fluffy, but won’t dissolve the moment your pick up your burger.
I had a few trials (with numerous errors) and then I came across this recipe from The Clever Carrot (she originally got the recipe from the NY Times). I made them (with just a couple of tweaks) and they’re perfect!
What do we need?
How to make them
Full recipe with detailed steps in the recipe card at the end of this post.
- Mix the yeast with water, milk and sugar, and then leave for 5 minutes until it starts to foam.
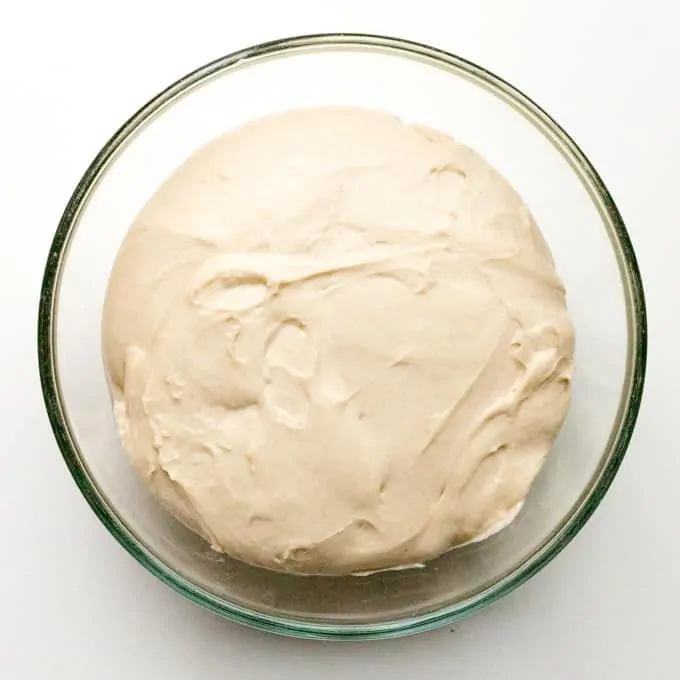
- Meanwhile mix bread flour, all-purpose (plain) flour, salt and butter in a mixer, then beat in the yeast mixture along with 1 egg. Yes, only 1 egg is needed – which is a little unusual with brioche (usually you’d use at least 3), but trust me, is all you need to get a perfect, light-textured brioche. Beat the dough in the mixer for 10 minutes and then place in a bowl:
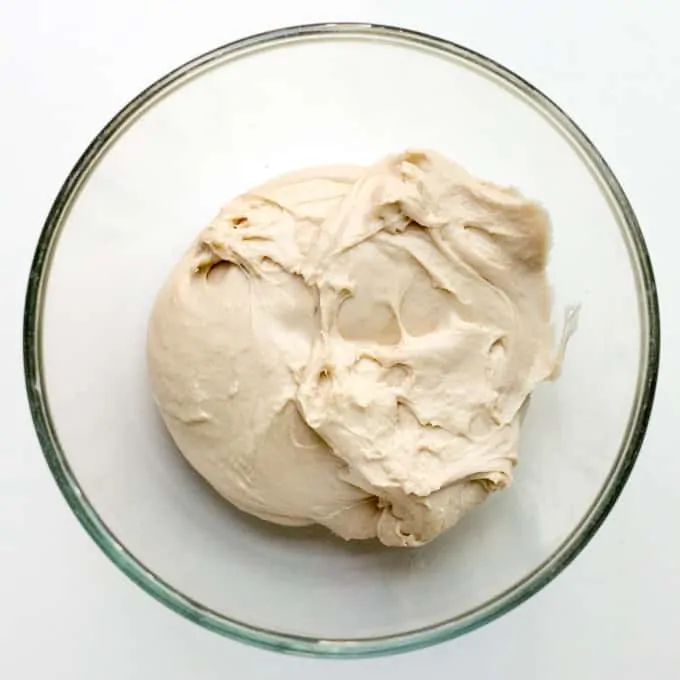
- Cover with clingfilm and leave to prove in a warm room for 1-2 hours until doubled in size:
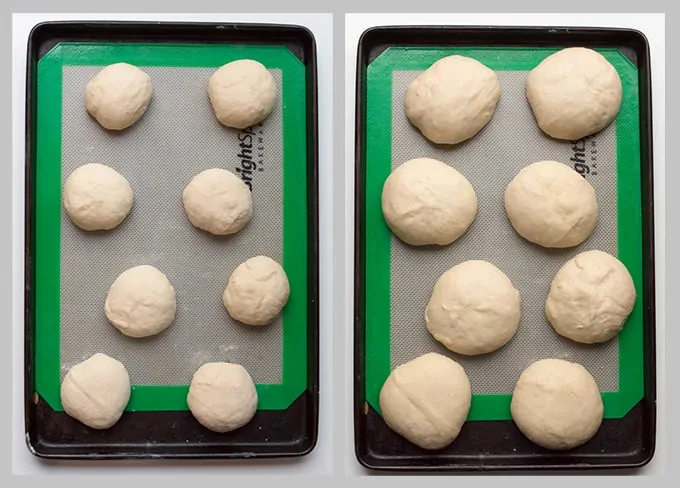
- Then knock the air out of the dough on a floured surface and split the dough into 8 pieces. Form each piece into a ball and place on a baking tray, cover (Pro tip: I like to use a bag or a damp tea towel over the top. I place my salt and pepper shaker on the tin to prop the bag/tea towel up, so they don’t touch the rolls). Prove again until almost doubled in size (1.5-2 hours):
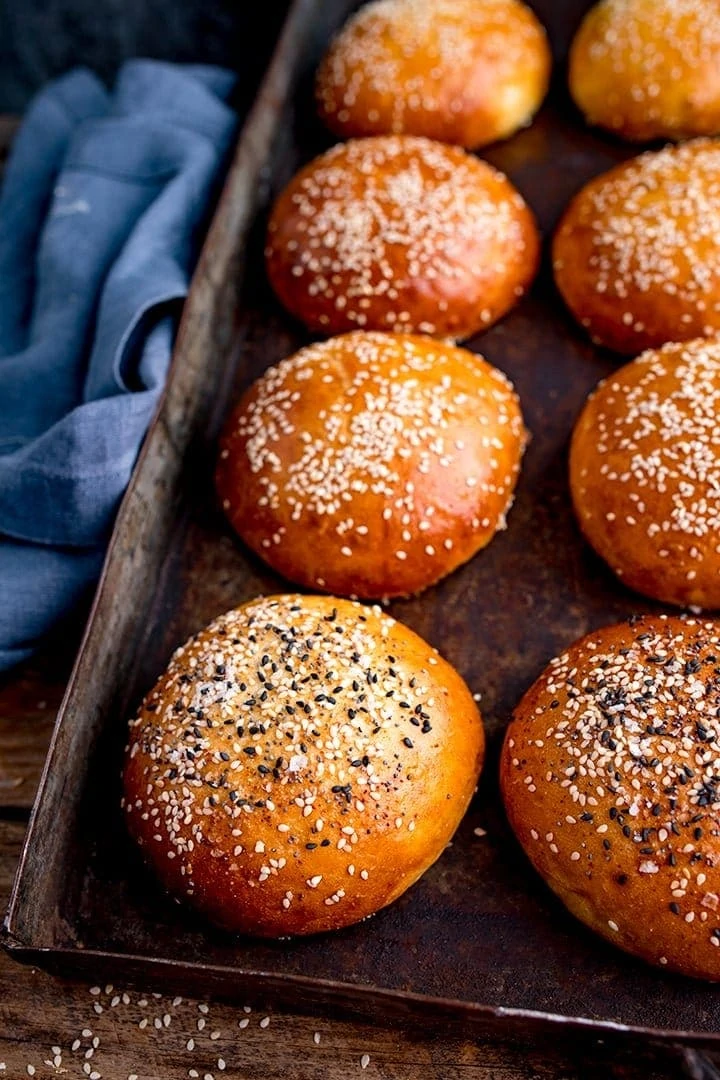
- Remove the cover, brush each roll with egg-wash. Use the egg wash sparingly – if it runs down the sides and pools under the bread, you’ll end up with a ring of crispy egg wash around the buns.
- At this point, you can leave the buns plain or you can sprinkle with sesame seeds. If you fancy something extra special, sprinkle with everything spice blend (<–affiliate link).
- Bake for 15 minutes until dark golden brown:
Leave to cool and then enjoy (trying not to slather the warm rolls in butter and eat them all before your burgers are ready).
What to put in your brioche buns
- Cheesy Veggie Burger – my favourite veg-packed meat-free burger!
- This classic Bacon Cheese Burger – topped with crispy onions rings
- This crispy Fish Burger – served with shoestring fries
- This Sticky Asian Pork Burger – topped with crunchy pickled veg (a real indulgent treat!) and filled with my favourite Chinese Pork Belly
- This cheesy veggie Chickpea Burger – topped with avocado and sweet chilli sauce
- This Thai Fish burger – spicy and delicious!
Are brioche buns good for burgers?
Brioche buns can be so rich and soft that they often fall apart when they come into contact with the juices from a meaty burger, as well as being squished when picking up that burger.
These buns are a little more substantial, but still lovely and soft with a fantastic flavour.
What makes a brioche bun different to a regular bun?
Brioche often contains several eggs (at least 3, sometimes up to 6) plus more sugar than a usual bread recipe. This recipe contains 2 eggs – one to go in the rolls, and one for the egg wash. It also contains just a little more sugar than usual brioche recipes. I find this is just right to make a richer, slightly sweet tasting roll, without it falling apart.
What to serve with your burger
- How about a tasty salad – I’ve got loads of them on Kitchen Sanctuary!
- Garlic Chilli oven baked fries
- Veggie matchstick fries
- Parmesan carrot fries or go the whole hog with some Pizza Fries
- This creamy coleslaw on the side
Watch how to make it
Stay updated with new recipes!
Subscribe to the newsletter to hear when I post a new recipe. I’m also on YouTube (new videos every week) and Instagram (behind-the-scenes stories & beautiful food photos).

Soft and Light Brioche Burgers Buns
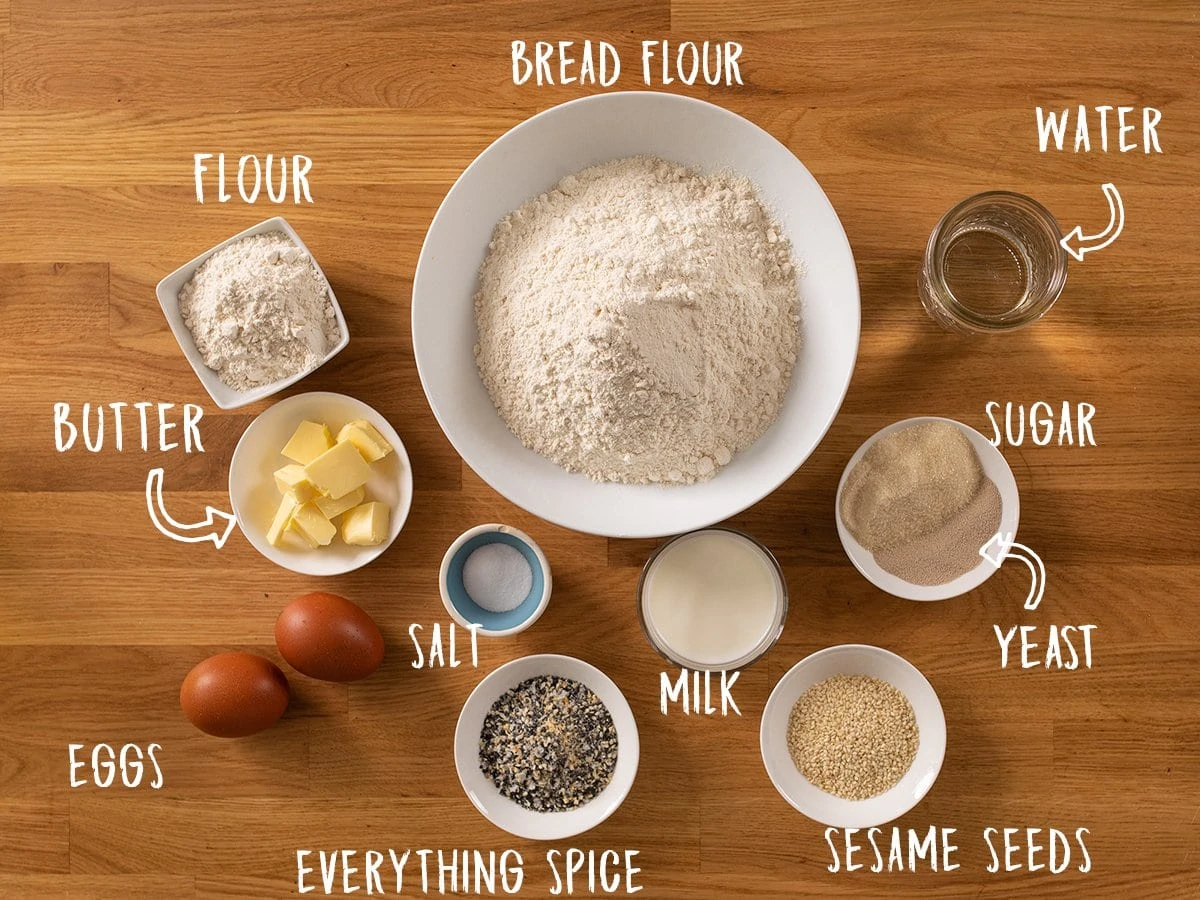
Ingredients
- 240 ml (1 cup) warm water
- 3 tbsp warm milk I used whole milk, but half-fat is fine
- 2 tsp dry active yeast
- 2 ½ tbsp caster sugar
- 360 g (3 cups) strong bread flour
- 60 g (1/2 cup) plain (all-purpose) flour plus extra for rolling
- 2 ½ tbsp unsalted butter softened
- 1 ½ tsp salt
- 2 large eggs
- 1 tbsp sesame seeds or everything spice (optional)
Instructions
- Place the warm water, milk, yeast, and sugar in a jug, give it a stir and leave for 5 minutes until the top of the liquid starts to foam slightly. If it doesn't foam then your yeast isn't active and you'll need to start again with a new packet of yeast.240 ml (1 cup) warm water, 3 tbsp warm milk, 2 tsp dry active yeast, 2 1/2 tbsp caster sugar
- Place the two flours, the butter, and salt into a mixer and mix together using the beater attachment for a minute – until you can no longer see lumps of butter.360 g (3 cups) strong bread flour, 60 g (1/2 cup) plain (all-purpose) flour, 2 1/2 tbsp unsalted butter, 1 1/2 tsp salt
- Add in the water/yeast mixture and one of the eggs, then beat again (using the beater attachment) for 10 minutes on medium speed. The dough will be sticky but will come together in a soft, slightly sticky ball towards the end.2 large eggs
- Place the dough in a large bowl and cover with clingfilm. Leave to rise in a warm room until doubled in sized (usually 1-2 hours).
- Line a large baking tray with baking parchment or a silicone mat.
- Once the dough has doubled in sized, tip it out onto a floured (plain /all-purpose flour) surface and punch the air out of it.
- Cut the dough as evenly as you can into 8 pieces. I weighed each of mine – they were 97g/3.4oz each.
- Pat both of your hands in the flour and then pick up a piece of dough, flatten it slightly in your hands and then put it on the work surface and pull the edges into the centre so you have a rough ball shape.
- Turn the ball over and gently roll it into more of a ball shape and place onto a large baking tray with the smoothest side at the top. Cup your hands around the sides of the ball and give it a little squeeze to add a tiny bit of height.
- Repeat with the remaining dough – ensuring there are at least a couple of inches between each ball – as they will expand.
- Place the tray in a large carrier bag (or 2 – one at each end of the tray so they meet in the middle) – making sure none of the bag touches the dough. If the dough touches it, it will stick. Leave to prove again until almost doubled in size – about 1.5-2 hours.
- Preheat the oven to 200C/400F (fan). Whisk your remaining egg with a tsp of cold water.2 large eggs
- Take the tray out of the bag and gently brush each of the buns all over the top and sides with egg wash. Make sure you don't have too much egg wash on your brush or it will run down the sides of the buns and pool at the bottom – leaving a crispy-eggy edge to the buns.
- You can leave the buns plain, or if you prefer, sprinkle with 1 tbsp of sesame seeds or 1 tbsp everything spice.1 tbsp sesame seeds or everything spice
- Place the buns in the oven and cook for 15 minutes until dark golden brown.
- Take out of the oven and leave to cool for 5 minutes on the tray, before removing from the tray on cooling further on a cooling rack.
Video
Notes
Trying serving warm with butter (forget the burger!)
These buns are delicious served slightly warm (don’t serve them straight from the oven though, as they’re still cooking inside as they’re cooling, and will be doughy if you eat them hot). Slather in a little salted butter and eat. Or slice then place them in the toaster for breakfast with some butter and jam.How long do brioche buns last?
The buns will keep for 1-2 days in a sealed container at room temperature. They will last for 3 days if, before you serve them, you split them open, brush with a little oil then grill/griddle them before placing your burger on (my favourite way to serve them).Can I freeze brioche buns?
Yes, cool the buns, then cover and freeze. Defrost at room temperate for a couple of hours. They should still be soft, but I find it’s best to split them open, brush with a little oil then grill/griddle them before placing your burger on. Nutritional information is per bun.Nutrition
Nutrition information is automatically calculated, so should only be used as an approximation.
This post was first published in March 2015. Updated in June 2019 with new photos, tips and serving suggestions. Updated again in November 2020 with additional photos and video.
Some of the links in this post may be affiliate links – which means if you buy the product I get a small commission (at no extra cost to you). If you do buy, then thank you! That’s what helps us to keep Kitchen Sanctuary running. The nutritional information provided is approximate and can vary depending on several factors. For more information please see our Terms & Conditions.


Hi, the buns look amazing. I already wrote to Nicky some time ago on twitter asking about them, but then I simply forgot about them. Well, here I am ..back. 🙂 I was wondering if I could add sourdough starter to the dough. Do you think it would work?
Hi Mateja, I haven’t tried it with sourdough starter, but I think it would work – presuming you’re just looking to add a bit of sourdough taste (not to replace the yeast).
I would measure out the sourdough starter, then swap that out with a little of the flour and water in the recipe and carry on with the rest of the recipe as normal.
Hope it works well – please let me know how it goes 🙂
what is the size of one bun?
Hi Frank,
They work out roughly 10cm (4in) in diameter.
Thanks
Chris
Thank you!
Hi, Just a question regarding oven temperatures, are the temps you quote for fan assisted or conventional?
HI Win,
The temps are fan assisted.
Thanks
Chris & Nicky
I made this previously and it was delicious but my buns were a bit flat as I didn’t knead enough (the engine on my magimix overheated!). I want to make them again (and hand knead) but this time I have fresh yeast. Do you know how I would modify the recipe for this? Do I still need to put the fresh yeast in the milk/water/sugar mixture? My fresh yeast packet says one cube is for 1kg flour, so should I halve it or still use the whole thing (I’ve googled and it says double fresh yeast for dry yeast amounts). Any advice you have would be greatly appreciated!
(also thank you for your recipes, I use your website weekly and we love all your food in our house!)
Hi Amie,
Thanks so much, so pleased you are loving the recipes 🙂
Honestly, we have never tried the brioche buns with fresh yeast so I am a bit in the dark too 🙂
This is what I would refer to for conversions on dried to fresh yeast. https://www.dovesfarm.co.uk/hints-tips/cheat-sheets/yeast-conversion-table
Hope this helps. Please let us know how you get on.
Thanks
Chris & Nicky
Thank you so much for this conversion! I made them with the wrong amount of fresh yeast (too much) and it didn’t work very well – they were flat and tasted kind of like beer 🙂 We still ate them though! So I think the conversion table you’ve provided would be best for anyone else using fresh yeast.
Very yummy! Accidentally added more butter, but turned out great. Will make again.
i love the recipee.
i wish people who post them would not tell us also all their life story. it is exhausting to have to scroll till the real info.
There’s a jump to recipe button at the top of every page so you don’t have to scroll at all.
And welcome to my blog where I have the privilege of being able to write what I like on my pages, whilst providing free recipes to you.
These came out perfectly! I did a half recipe, since it was just my kid and me. And I did half white, half whole wheat (since we’re trying to cut back on white bread). But they held up beautifully under the juiciness of the meat, along with all the toppings.
Thank you!!! This will be our go-to!
Thank you for the conversion; I’ve used the recipe from the Clever Carrot quite a few times now, but the American habit of cooking entirely by volume measure – a late C.19th fad which should have died out but unfortunately made its way into a very influential cook book and so stuck – is quite infuriating!
Incidentally though, with active yeast there’s absolutely no need to activate it in sugared water. It’s intended to be blended with dry ingredients, and the packaging will often specify that it needn’t be added to liquid. You do that with old fashioned dried yeast – which is simply dried out fresh yeast – but the whole point of active yeast is to be able to skip that bit. I’ve used this recipe several times and have routinely ignored the yeast-blooming step, and it comes out perfectly.
The recipe says 2 eggs so i put both in the dough and anyway the bread is delicious and fluffy but my question is if i only put 1 egg in the mix the bread would be better and more soft??
I haven’t tried it with two eggs, but I think it would be just as fluffy with one egg or two.
Fantastic recipe!
Well this was my first attempt at a sweet dough, the initial consistency made me slightly nervous but after reading the well explained method the dough soon came together as described. I found 10 mins was a perfect cooking time for my fan oven, So proud of myself & pleased with the result 🙌 these shall be a firm favourite, thank you 😊😊
Awesome recipe. Dough came together into a ball after ten minutes of beating, just like the instructions said it would, so I knew I was on to a good recipe at that point. The best bread rolls I’ve made; came out like in the photo and very light and fluffy. I have a fan oven, so baked at 180°C rather than 200. Making them again now two days later. Thanks so much for this.